Eric

Razor Components in Blazor

Since the release candidate for .NET Core 3.0 is getting closer it seemed like a good time to take a closer look at Blazor, as you can tell from the string of Blazor posts lately. For this post, I’m taking my first look at Razor Components in a Blazor server-side application.

This post is working off the same sample project used in the following posts. The first one contains the creation of the project if you want to follow along.

ASP.NET Core Server-Side Blazor with Authentication
Blazor Authentication: Hide a Nav Menu Item

What are Razor Components?

To quote the docs:

A component is a self-contained chunk of user interface (UI), such as a page, dialog, or form. A component includes HTML markup and the processing logic required to inject data or respond to UI events. Components are flexible and lightweight. They can be nested, reused, and shared among projects.

Basically, Razor Components gives us a way to create smart reusable chunks of UI.

Create a new Razor Component

To start I created a new Components directory in my project. This isn’t required, but it was how one of the Blazor sample projects were set up. Caution, if you do follow this path make sure and add the new namespace to _Imports.razor or your components will fail to render. Please don’t ask how long it took for me to figure that out.

@using System.Net.Http
@using Microsoft.AspNetCore.Components.Forms
@using Microsoft.AspNetCore.Components.Layouts
@using Microsoft.AspNetCore.Components.Routing
@using Microsoft.JSInterop
@using BlazorAuth
@using BlazorAuth.Shared
@using BlazorAuth.Components

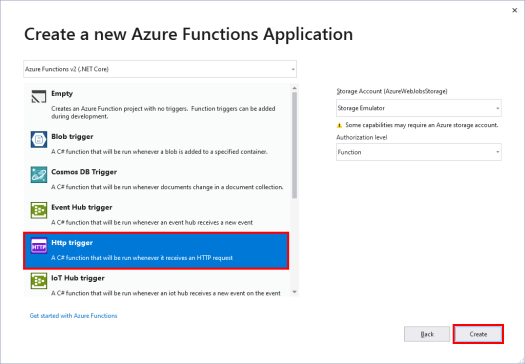
Right-click on the directory you want to create the component in and select Add > New Item.

In the Add New Item dialog select Razor Component, give the component a name and click Add.

The resulting file will look like the following.

<h3>HelloWorld</h3>

@code {

}

For this component, I don’t have any code so I deleted that section and added space between Hello and World. To use this component you can add <HelloWorld /> to any of your existing components or pages. For example, in the sample application, I changed the Index.razor to include the new component.

@page "/"

Welcome to your new app.

<HelloWorld />

The above will render as the following.

A Component with a Parameter

The above is great, but we all know that a component that only contains static HTML isn’t going to be super useful without the ability to make parts of the component more dynamic. The following example is only one of the ways to get data into a component.

The following bit of code is a new component that has a private name property that is marked with the Parameter attribute. This property can then be used in the non-code section of the component in the standard Razor syntax way.

<h3>Hello @Name!</h3>

@code {
    [Parameter]
    private string Name {get; set;}
}

The following is the usage of the HelloName component back in the Index.razor and is passing in a name via the name parameter.

@page "/"

Welcome to your new app.

<HelloWorld />
<HelloName Name="Eric" />

And the resulting output when the application is run.

Wrapping Up

Components provide a great unit of reusability. I highly recommend you take some time to play around with them. Also, make sure and check out the Create and use ASP.NET Core Razor components doc from Microsoft as it covers the full range of options when developing components.

Razor Components in Blazor Read More »

Blazor Authentication: Hide a Nav Menu Item

In last week’s post, Server-Side Blazor with Authentication, we covered creating a Server-Side Blazor application with Authentication and then used the attribute to not allow the user to view the Fetch data page if they weren’t logged in.

While the authorize attribute does keep the user from viewing the contents of the page it still allows the user access to the nav menu item for the page they aren’t authorized to access. This is going to be a quick post showing how the AuthorizedView component can be used to hide any content that a user should be logged in to see (or be in a specific role).

Hide a Nav Menu Item

In the Pages/Shared directory open the NavMenu.razor file which is the file where the nav menu is defined. The following code is the code that renders the Fetch data menu item which is the section we want to hide if the user isn’t logged in.

<li class="nav-item px-3">
    <NavLink class="nav-link" href="fetchdata">
        <span class="oi oi-list-rich" aria-hidden="true"></span> Fetch data
    </NavLink>
</li>

To hide menu item we wrap the list item in the AuthorizeView component.

<AuthorizeView>
    <li class="nav-item px-3">
        <NavLink class="nav-link" href="fetchdata">
            <span class="oi oi-list-rich" aria-hidden="true"></span> Fetch data
        </NavLink>
    </li>
</AuthorizeView>

Do note that you should still use the Authorize attribute on the page that should require authorization and not depend on the menu item being hidden keeping users from finding the page.

Wrapping Up

While the Authorize attribute is still very useful I’m sure that the AuthorizeView will be getting a lot of use in Blazor apps. AuthrozieView has the advantage of not being limited to page component.

Also, note that AuthorizeView also supports roles and policies. Make sure and check out the official AuthorizeView component docs for more details. If interested the code for the component is on GitHub.

Blazor Authentication: Hide a Nav Menu Item Read More »

ASP.NET Core Server-Side Blazor with Authentication

It has been close to a year since I did my first into post on Blazor, ASP.NET Core Basics: Blazor, and a lot has changed. The biggest thing is that it was announced that Server-Side Blazor is going to ship with .NET Core 3. This post is going to walk through creating a server-side Blazor application including authentication.

Sever-Side Blazor

What is server-side Blazor and how is it different from client-side Blazor? The quick answer is that client-side Blazor uses WebAssembly and Mono to run .NET code in the browser allowing for basically a SPA written in .NET. With Server-Side Blazor the app is executed on the server and update/processing are requested over a SignalR connection.

For a deeper dive into the differences check out the ASP.NET Core Blazor hosting models doc.

Pre-requisites

To start make sure to install at least preview 6 of .NET Core 3. Using a command prompt you can run the following command to see which versions of the .NET Core SDK are installed.

dotnet --list-sdks

The previews of .NET Core 3 can be downloaded from here. Also, make sure to use the latest preview of Visual Studio 2019.

Application Creation

I used the following command from the command prompt to create a new Blazor application using individual authentication.

dotnet new blazorserverside --auth Individual

Visual Studio also has the template available if you select the ASP.NET Core Web Application project type and about three screens in select the Blazor Server App option.

After the creation process is complete open the project in Visual Studio. At this point, if you run the application you will see the standard options to log in or register.

Requiring Auth for a Page

At this point, the application allows account creation and login, but all pages are available to all user, even if they aren’t logged in. There are multiple ways to deal with this. For this post, I’m going with the closest to what I am used to from MVC which is using an Authorize attribute. In the Pages directory open then FetchData.razor file and make the following changes to make the page require the user to be authorized. Note that this method should only be used on page components.

Before:

@page "/fetchdata"
@using BlazorAuth.Data
@inject WeatherForecastService ForecastService

After:

@page "/fetchdata"
@using BlazorAuth.Data
@using Microsoft.AspNetCore.Authorization
@attribute [Authorize]
@inject WeatherForecastService ForecastService

Now if you go to the Fetch data page without being logged in you will see a Not authorized message. This message can be customized using the AuthorizeView component. You can find more details in the docs.

Wrapping Up

It is neat seeing how far Blazor has come since I last played with it. The docs are great and the product has improved a ton. I may do a follow-up post to go more into how to use the AuthorizeView component.

Make sure to check out the official docs on Blazor authentication and authorization to get the full picture of the subject.

ASP.NET Core Server-Side Blazor with Authentication Read More »

Summer Schedule Challenges

I’m writing just before July 4th, which in the United States is a national holiday. My family is taking advantage of this extra time off to travel to St. Louis for the first time. This is just one example of the many scheduling challenges that the summer season brings to my writing schedule.

Normal Schedule

Typically I am able to get my posts written in the hours before work by getting up an hour or two before I would have to in order to make it to the office on time. My wife gives me a hard time about getting up early, but getting at least one post done a week is something I am very proud of and don’t want to compromise on.

Dealing with the Summer Schedule

The question is how to deal with the changes in time expectations, but still get everything done. This week, for example, I only have 3 work days and will be traveling the rest of the week. The most important thing I have done to handle this situation is having 3 to 4 weeks of post done ahead of time. Knowing that I have a buffer of posts reduced my stress level related to my blog tremendously.

The other way I handle weeks with a lack of time is posts like this which are non-technical and therefore take a lot less time to write. The downside is these type of post don’t get very many reads. On the positive, it allows me some practice in a different writing style. I also hope that even if it isn’t super popular that someone gets some value out of it.

Wrapping Up

Hopefully, someone found something useful in this post. If you do like this type of post I would love to get some feedback on some non-technical topics that you all might be interested in. I don’t see this blog ever changing from primarily technical topics, but it is fun for me to mix it up occasionally.

Summer Schedule Challenges Read More »

Azure Function App Log Streaming

One of the things I have noticed while exploring Azure Function Apps is it is important to find ways to track what is going on during execution. While exploring the Azure Portal for one of my functions apps I noticed an option for steaming logs. This post is going to show how to get to the streaming logs for a Function App.

Log Streaming Location

From the Azure Portal open your Function App and select Platform features and then click the Log streaming link.

Log Streaming View

The following screenshot is from my sample App and has two different function executions listed.

Wrapping Up

For this small sample application, this feature isn’t critical, but on a larger application, it would become much more important. Log streaming is a quick way to get an idea of what is going on, but would only be one part of knowing what is going on.

Azure Function App Log Streaming Read More »

Create an Azure Function App from Visual Studio

When I started looking at Azure Function Apps in the post, Azure Functions Introduction, I used the Azure Portal to create the sample function App used in the post. On the follow-up post, Open an Azure Portal Created Function in Visual Studio, I showed how to get a portal created function to open in Visual Studio. The code download from the Azure Portal was in the csx format instead of the cs format that Visual Studio normally deals with so a lot of Visual Studio doesn’t work.

This post is going to walk through creating a new Azure Function App from within Visual Studio. My hope is that starting from Visual Studio will result in code that is more Visual Studio friendly. This post will be using Visual Studio 2019.

App Creation

Open Visual Studio and click  Create a new project on the start dialog.

On the next screen search from Azure Functions. Click on the Azure Functions item and click the Next button.

Enter a Project name, and change any other settings if needed, then click Create.

The next dialog will ask for the type of trigger to use. To match the function we created a few weeks ago on the Azure Portal we are going to use an Http trigger and click Create.

Clicking the last Create button will kick off the project creation process. When done you will have a project with a single function that will match the following inside of the file Function1.cs.

public static class Function1
{
    [FunctionName("Function1")]
    public static async Task<IActionResult> Run(
        [HttpTrigger(AuthorizationLevel.Function, "get", "post", Route = null)] HttpRequest req,
        ILogger log)
    {
        log.LogInformation("C# HTTP trigger function processed a request.");

        string name = req.Query["name"];

        string requestBody = await new StreamReader(req.Body).ReadToEndAsync();
        dynamic data = JsonConvert.DeserializeObject(requestBody);
        name = name ?? data?.name;

        return name != null
            ? (ActionResult)new OkObjectResult($"Hello, {name}")
            : new BadRequestObjectResult("Please pass a name on the query string or in the request body");
    }
}

The following is the Portal created function from a few weeks ago.

public static async Task<IActionResult> Run(HttpRequest req, ILogger log)
{
    log.LogInformation("C# HTTP trigger function processed a request.");

    string name = req.Query["name"];

    string requestBody = await new StreamReader(req.Body).ReadToEndAsync();
    dynamic data = JsonConvert.DeserializeObject(requestBody);
    name = name ?? data?.name;

    return name != null
        ? (ActionResult)new OkObjectResult($"Hello, {name}")
        : new BadRequestObjectResult("Please pass a name on the query string or in the request body");
}

You will notice that the body of the two is the same. The Visual Studio version is using attributes to let Azure know the name, the trigger type, and other information that will be needed once the function is published to Azure.

Local Testing

One really neat thing about using Visual Studio for your function development is you can debug them locally. If you hit the play button (or F5) Visual Studio will launch your function locally. You will see something like the following.

Highlighted is the section listing all the Http Functions in the applications along with URLs that can be used to test them. For this example, the following URL could be used to get the response “Hello, Eric”.

http://localhost:7071/api/Function1?name=Eric

As far as I have seen so far all the normal debugging features of Visual Studio seem to work when running a function locally.

App Publication

Now that we have created and tested our Function App locally it is time to publish it to Azure. Right-click on the project file in Solution Explorer and click Publish.

On the Publish dialog, we are going to Create New and Run from package file since it is recommended (see the docs for why it is recommended). Finally, click the Publish button.

The next dialog is the configuration for the App Service that will be created in Azure. You can take the defaults and hit Create, but I always take the extra time to create a new resource group so that my samples are easy to remove when I am done with them.

Clicking the create button will start the deployment to Azure which will take a few minutes. After the deployment, you can use the Azure Portal to test your Function App. More information on running a function from the Azure Portal can be found in the Azure Functions Introduction post.

Wrapping Up

While creating a function via the Azure Portal is the fastest way to get started, I would recommend you start locally. The slightly longer getting started time it worth it for the better tooling and flexibility it provides.

Create an Azure Function App from Visual Studio Read More »

Open an Azure Portal Created Function in Visual Studio

In last week’s post, Azure Functions Introduction, we created a new Azure Function App with a single function triggered via HTTP. The Portal is great for the initial creation of a function, but what happens when your needs change? For instance, you might want to store your functions in a repo with the rest of the code for your application. In this post, we are going to walk through taking our portal created function and getting it downloaded where it can be edited in Visual Studio.

Download App Content

From the Azure Portal select App Services.

Next, select the Function App you want to get the code for.

The detail of the Function App will load and at the top of the screen click on the Download app content option.

On the popup that shows select Content and Visual Studio Project and then click the Download button.

Once clicking download you will get a zip file containing everything in your Function App. Extract the files and double click the project file to open it in Visual Studio.

Changing a Function

The project will have a folder per function that exist in your applications. In our example, you would see a HttpTrigger1 directory and inside that directory, the code for the actual function is in the run.csx file.  Looking at the code you will see that it is the same that you would have seen in the portal. Here is the code.

#r "Newtonsoft.Json"

using System.Net;
using Microsoft.AspNetCore.Mvc;
using Microsoft.Extensions.Primitives;
using Newtonsoft.Json;

public static async Task<IActionResult> Run(HttpRequest req, ILogger log)
{
    log.LogInformation("C# HTTP trigger function processed a request.");

    string name = req.Query["name"];

    string requestBody = await new StreamReader(req.Body).ReadToEndAsync();
    dynamic data = JsonConvert.DeserializeObject(requestBody);
    name = name ?? data?.name;

    return name != null
        ? (ActionResult)new OkObjectResult($"Hello, {name}")
        : new BadRequestObjectResult("Please pass a name on the query string or in the request body");
}

At this point, you could change anything you wanted about the application. I’m going to change the return value.

Before:
(ActionResult)new OkObjectResult($"Hello, {name}")

After:
(ActionResult)new OkObjectResult($"Yo, {name}")

Pushing Changes back to Azure

Now that we have a change to our function how do we get that change back to Azure? Head back to the overview page for your Azure Function App and click the Get publish profile link.

In Visual Studio right-click on the project and select Publish.

In the publish dialog click the Import Profile button and select the profile you download from Azure.

Once the profile is imported you can then click the Publish button to push any changes to your Azure Function App.

At this point, if you execute your function you should see the changes you made in Visual Studio.

Wrapping Up

While the above works it isn’t actually very friendly in Visual Studio since the function is a csx file instead of a cs file that normal C# uses. For next week look for an example of starting a function app from Visual Studio to see if it results in a project that will be easier to maintain.

Open an Azure Portal Created Function in Visual Studio Read More »

Deploy ASP.NET Core 3 Previews to Azure App Using Extensions

A few weeks ago when the post Deploy ASP.NET Core 3 Previews to Azure App Service I got an email from Jerrie Pelser who pointed out that there are extensions available for App Service that allow usage of the public previews of ASP.NET Core 3 without having to do a self-contained deployment.

In addition to Jerrie’s suggestion pajaybasu pointed out in this Reddit post that using Docker is another option. Pajaybasu also pointed out a line in the original post where I that self-contained deployments were the only option which of course was incorrect.

The first half of this post is going to be the same as the original post which covers the creation and the initial publication to Azure App Service. The last half will cover using an extension to enable the preview version of ASP.NET Core.

Sample Application

I used the following .NET CLI command to create a new ASP.NET Core application using React for its front end.

dotnet new react

After the creation process is complete open the project in Visual Studio. I highly recommend using the Visual Studio 2019 preview release when working with any .NET Core 3 applications.

Publish to App Service

In Visual Studio’s Solution Explorer right click on the project file and select Publish.

Select App Service for the publish target. Here we are creating a new app service. Next, click Publish.

The next dialog if the information about the new App Service that will be created. I took the defaults for the most part. I did create a new resource group for this application to make the resources easier to clean up in the future. I also changed the hosting plan to the free tier. Click Create to continue.

The Error and the Warning

As part of the publishing process, a browser will be opened to the address of the application. When this happens you will see an error about ANCM In-Process Handler Load Failure (if you are using IIS In-Process Hosting).

If you look back at Visual Studio you will see the following warning that your application requires the .NET Core runtime 3.0 and App Service only supports up to 2.2. Since we are going to fix this in App Service I recommend selecting Don’t perform check in the future (only this profile).

Another Fix

For this version of the fix, go to your App Service in the Azure Portal. In the menu under the Development Tools select the Extensions option.

On the next page click the Add button at the top. Click on the Choose Extension and select the ASP.NET Core 3.0 (x86) Runtime option.

Next, click Legal Terms, read the terms and if you are OK with the terms then click the OK button. You will then have to click OK on the add extension blade which will start the extension installation.

If you were to load your site at this point you would still get the 500 error. Under Settings click the Configuration and click on General settings turn Web sockets On and click Save.

At this point, your site should be working. You can also go back and turn web sockets back off and the site will continue working. I have no idea what toggling web sockets does to make everything start working, but thanks to this comment on a GitHub issue for the key to getting this working.

Wrapping Up

Hopefully, between this post and the previous one using a self-contained deployment, you won’t have any issues trying out the .NET Core 3 with App Service.

Deploy ASP.NET Core 3 Previews to Azure App Using Extensions Read More »

Azure Functions Introduction

Serverless seems to be all the rage these days. Each of the major cloud providers has a serverless offering with Azure Functions, AWS Lambda, and Google Cloud Functions. One of the big selling points of serverless function is the automated scaling based on your workload and the low cost.

For example with Azure using consumption billing, you get 1 million executions for free with each additional million executions costing only $0.20. It does get more complex as there is a charge based on execution time mixed with resource consumption, but you can check out the pricing page for the details.

This post is going to cover creating and calling a very simple function. Note that you will need an Azure account, if needed you can sign up for a free account.

Function App Creation

There are a lot of options to create a new function using everything from Visual Studio to the Azure CLI. For this post, we will be using the Azure Portal to create our function. Head to the portal and using the search box at the top search for function and in the results select Function App.

The above will take you to a list of your functions apps. Click either the Add button at the top of the page or the Create Function App button to create a new Function App.

The next step has a lot of options, but for this first, go we are going enter an App name and take the defaults for the rest of the options and click Create.

Clicking create will queue the deployment of a new function app and return you to the list of function apps on your account. After a few minutes, your new app should show in the list, this took almost 3 minutes for me. Once your app shows in the list select it.

Add a Function

Now that we have a Functions App it is time to add a Function. On the menu click the  + next to Functions.

The next screen will ask you to select a development environment. I will be using the In-portal option. After making the selection click Continue.

The next page will ask about how the function should be triggered. We will be using the Webhook + API option. There are a lot of options for triggers I recommend selecting the More templates option and exploring at some point. When finished click the Create button.

After the creation is finished you will see the code for your new function, which is defaulted to take a request with a name and respond with hello using the name supplied.

From the above page, you can make changes to your function and save them. To try the function out hit the Run button. Hitting the run button will show you the Test area where you can change and run the request to your function as you want and use the Run button to send the request.

Wrapping Up

While we have only scraped the smallest part of the surface of Azure Function Apps I can see why people are excited about the value they can provide. It was surprisingly simple to get started.

Stay tuned if you are interested in functions as I  play to do more exploration on this topic.

Azure Functions Introduction Read More »

Azure Application Insights: Analytics

I found one more feature of Azure Application Insights I wanted to point out before changing subjects. If you are just joining it might be worth checking out the previous entries in this series.

Add Application Insights to an Existing ASP.NET Core Application
Azure Application Insights Overview

Analytics

On the overview of your Application Insights resource click on the Analytics button.

This will take you to a page that will let you query your Application Insight data. The following is the page you will see with one of the example queries and the results it provides.

The official docs for Analytics provide a lot of good resources and I recommend checking them out. We are going to do some exploration in this post, but this post won’t be enough to fully explorer all you can accomplish with Analytics.

If you want to explore Analytics and you don’t have a site up yet or your site doesn’t have much data, like my sample application, check out the Analytics Playground provided by Microsoft.

Schema

Analytics provides a very powerful way to query for information about your application. The first thing I recommend you doing is exploring the schema of the data available. The left side of the page provides the details of the schema that is available. As you can see in the screenshot below you can query details from traces, page views, request, performance counts just to call out a few. Each type has its own set of fields available.

Query Entry

The query entry area is in the top center of the page. You can read up on the details of the query language here. Thankfully the query editor provides IntelliSense as you can see in the screenshot below.

While the syntax isn’t anything like SQL the data is organized in a way that having SQL experience helped me think about how to explored and relate the data.

Results

Clicking the Run button will execute your query and you will the results in the bottom of the page. As you can see the results default to a time chart based on the render statement in the query above.

The chart type can be changed in the results area. There is also an option to view results in a table view (this is the default view if you don’t have a render statement in your query).

Wrapping Up

It is amazing how many features Application Insights provides. I glad I happened to notice Analytics. If you are using Application Insights take the time and really explore all the features that it provides. You never know when you will find a feature that could up being a critical insight into your application.

Azure Application Insights: Analytics Read More »