Azure Functions

Azure Function App Log Streaming

One of the things I have noticed while exploring Azure Function Apps is it is important to find ways to track what is going on during execution. While exploring the Azure Portal for one of my functions apps I noticed an option for steaming logs. This post is going to show how to get to the streaming logs for a Function App.

Log Streaming Location

From the Azure Portal open your Function App and select Platform features and then click the Log streaming link.

Log Streaming View

The following screenshot is from my sample App and has two different function executions listed.

Wrapping Up

For this small sample application, this feature isn’t critical, but on a larger application, it would become much more important. Log streaming is a quick way to get an idea of what is going on, but would only be one part of knowing what is going on.

Azure Function App Log Streaming Read More »

Create an Azure Function App from Visual Studio

When I started looking at Azure Function Apps in the post, Azure Functions Introduction, I used the Azure Portal to create the sample function App used in the post. On the follow-up post, Open an Azure Portal Created Function in Visual Studio, I showed how to get a portal created function to open in Visual Studio. The code download from the Azure Portal was in the csx format instead of the cs format that Visual Studio normally deals with so a lot of Visual Studio doesn’t work.

This post is going to walk through creating a new Azure Function App from within Visual Studio. My hope is that starting from Visual Studio will result in code that is more Visual Studio friendly. This post will be using Visual Studio 2019.

App Creation

Open Visual Studio and click  Create a new project on the start dialog.

On the next screen search from Azure Functions. Click on the Azure Functions item and click the Next button.

Enter a Project name, and change any other settings if needed, then click Create.

The next dialog will ask for the type of trigger to use. To match the function we created a few weeks ago on the Azure Portal we are going to use an Http trigger and click Create.

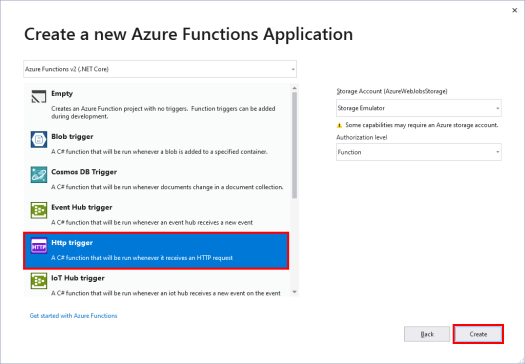
Clicking the last Create button will kick off the project creation process. When done you will have a project with a single function that will match the following inside of the file Function1.cs.

public static class Function1
{
    [FunctionName("Function1")]
    public static async Task<IActionResult> Run(
        [HttpTrigger(AuthorizationLevel.Function, "get", "post", Route = null)] HttpRequest req,
        ILogger log)
    {
        log.LogInformation("C# HTTP trigger function processed a request.");

        string name = req.Query["name"];

        string requestBody = await new StreamReader(req.Body).ReadToEndAsync();
        dynamic data = JsonConvert.DeserializeObject(requestBody);
        name = name ?? data?.name;

        return name != null
            ? (ActionResult)new OkObjectResult($"Hello, {name}")
            : new BadRequestObjectResult("Please pass a name on the query string or in the request body");
    }
}

The following is the Portal created function from a few weeks ago.

public static async Task<IActionResult> Run(HttpRequest req, ILogger log)
{
    log.LogInformation("C# HTTP trigger function processed a request.");

    string name = req.Query["name"];

    string requestBody = await new StreamReader(req.Body).ReadToEndAsync();
    dynamic data = JsonConvert.DeserializeObject(requestBody);
    name = name ?? data?.name;

    return name != null
        ? (ActionResult)new OkObjectResult($"Hello, {name}")
        : new BadRequestObjectResult("Please pass a name on the query string or in the request body");
}

You will notice that the body of the two is the same. The Visual Studio version is using attributes to let Azure know the name, the trigger type, and other information that will be needed once the function is published to Azure.

Local Testing

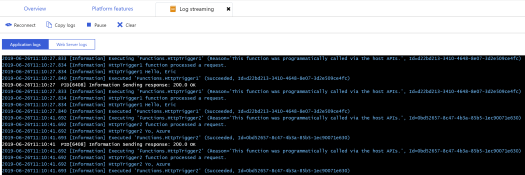
One really neat thing about using Visual Studio for your function development is you can debug them locally. If you hit the play button (or F5) Visual Studio will launch your function locally. You will see something like the following.

Highlighted is the section listing all the Http Functions in the applications along with URLs that can be used to test them. For this example, the following URL could be used to get the response “Hello, Eric”.

http://localhost:7071/api/Function1?name=Eric

As far as I have seen so far all the normal debugging features of Visual Studio seem to work when running a function locally.

App Publication

Now that we have created and tested our Function App locally it is time to publish it to Azure. Right-click on the project file in Solution Explorer and click Publish.

On the Publish dialog, we are going to Create New and Run from package file since it is recommended (see the docs for why it is recommended). Finally, click the Publish button.

The next dialog is the configuration for the App Service that will be created in Azure. You can take the defaults and hit Create, but I always take the extra time to create a new resource group so that my samples are easy to remove when I am done with them.

Clicking the create button will start the deployment to Azure which will take a few minutes. After the deployment, you can use the Azure Portal to test your Function App. More information on running a function from the Azure Portal can be found in the Azure Functions Introduction post.

Wrapping Up

While creating a function via the Azure Portal is the fastest way to get started, I would recommend you start locally. The slightly longer getting started time it worth it for the better tooling and flexibility it provides.

Create an Azure Function App from Visual Studio Read More »

Open an Azure Portal Created Function in Visual Studio

In last week’s post, Azure Functions Introduction, we created a new Azure Function App with a single function triggered via HTTP. The Portal is great for the initial creation of a function, but what happens when your needs change? For instance, you might want to store your functions in a repo with the rest of the code for your application. In this post, we are going to walk through taking our portal created function and getting it downloaded where it can be edited in Visual Studio.

Download App Content

From the Azure Portal select App Services.

Next, select the Function App you want to get the code for.

The detail of the Function App will load and at the top of the screen click on the Download app content option.

On the popup that shows select Content and Visual Studio Project and then click the Download button.

Once clicking download you will get a zip file containing everything in your Function App. Extract the files and double click the project file to open it in Visual Studio.

Changing a Function

The project will have a folder per function that exist in your applications. In our example, you would see a HttpTrigger1 directory and inside that directory, the code for the actual function is in the run.csx file.  Looking at the code you will see that it is the same that you would have seen in the portal. Here is the code.

#r "Newtonsoft.Json"

using System.Net;
using Microsoft.AspNetCore.Mvc;
using Microsoft.Extensions.Primitives;
using Newtonsoft.Json;

public static async Task<IActionResult> Run(HttpRequest req, ILogger log)
{
    log.LogInformation("C# HTTP trigger function processed a request.");

    string name = req.Query["name"];

    string requestBody = await new StreamReader(req.Body).ReadToEndAsync();
    dynamic data = JsonConvert.DeserializeObject(requestBody);
    name = name ?? data?.name;

    return name != null
        ? (ActionResult)new OkObjectResult($"Hello, {name}")
        : new BadRequestObjectResult("Please pass a name on the query string or in the request body");
}

At this point, you could change anything you wanted about the application. I’m going to change the return value.

Before:
(ActionResult)new OkObjectResult($"Hello, {name}")

After:
(ActionResult)new OkObjectResult($"Yo, {name}")

Pushing Changes back to Azure

Now that we have a change to our function how do we get that change back to Azure? Head back to the overview page for your Azure Function App and click the Get publish profile link.

In Visual Studio right-click on the project and select Publish.

In the publish dialog click the Import Profile button and select the profile you download from Azure.

Once the profile is imported you can then click the Publish button to push any changes to your Azure Function App.

At this point, if you execute your function you should see the changes you made in Visual Studio.

Wrapping Up

While the above works it isn’t actually very friendly in Visual Studio since the function is a csx file instead of a cs file that normal C# uses. For next week look for an example of starting a function app from Visual Studio to see if it results in a project that will be easier to maintain.

Open an Azure Portal Created Function in Visual Studio Read More »

Azure Functions Introduction

Serverless seems to be all the rage these days. Each of the major cloud providers has a serverless offering with Azure Functions, AWS Lambda, and Google Cloud Functions. One of the big selling points of serverless function is the automated scaling based on your workload and the low cost.

For example with Azure using consumption billing, you get 1 million executions for free with each additional million executions costing only $0.20. It does get more complex as there is a charge based on execution time mixed with resource consumption, but you can check out the pricing page for the details.

This post is going to cover creating and calling a very simple function. Note that you will need an Azure account, if needed you can sign up for a free account.

Function App Creation

There are a lot of options to create a new function using everything from Visual Studio to the Azure CLI. For this post, we will be using the Azure Portal to create our function. Head to the portal and using the search box at the top search for function and in the results select Function App.

The above will take you to a list of your functions apps. Click either the Add button at the top of the page or the Create Function App button to create a new Function App.

The next step has a lot of options, but for this first, go we are going enter an App name and take the defaults for the rest of the options and click Create.

Clicking create will queue the deployment of a new function app and return you to the list of function apps on your account. After a few minutes, your new app should show in the list, this took almost 3 minutes for me. Once your app shows in the list select it.

Add a Function

Now that we have a Functions App it is time to add a Function. On the menu click the next to Functions.

The next screen will ask you to select a development environment. I will be using the In-portal option. After making the selection click Continue.

The next page will ask about how the function should be triggered. We will be using the Webhook + API option. There are a lot of options for triggers I recommend selecting the More templates option and exploring at some point. When finished click the Create button.

After the creation is finished you will see the code for your new function, which is defaulted to take a request with a name and respond with hello using the name supplied.

From the above page, you can make changes to your function and save them. To try the function out hit the Run button. Hitting the run button will show you the Test area where you can change and run the request to your function as you want and use the Run button to send the request.

Wrapping Up

While we have only scraped the smallest part of the surface of Azure Function Apps I can see why people are excited about the value they can provide. It was surprisingly simple to get started.

Stay tuned if you are interested in functions as I  play to do more exploration on this topic.

Azure Functions Introduction Read More »