Visual Studio

Add Git Ignore to an existing Visual Studio Solution (New Git Experience)

A few years ago I wrote a post covering how to Add Git Ignore to an existing Visual Studio Project which was using Visual Studio 2015 I believe. Though it is an old post, it holds up through the current version of Visual Studio. Fast forward to today and Visual Studio has a new Git Experience in preview which alters this process. This post will cover adding a Git ignore file to an existing solution using Visual Studio’s new Git experience. If you don’t see the Git menu in Visual Studio see the previous link for information on enabling the feature preview.

Using Visual Studio to add a .gitignore

Open Visual Studio and the solution needing an ignore file. From the top menu select Git > Settings.

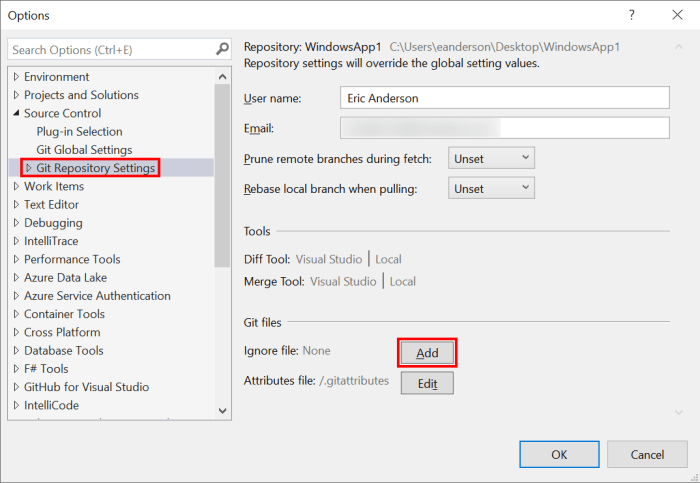
The above will open Visual Studio’s Options with Source Control > Git Global Settings selected. From the list on the left select Git Repository Settings and then click the Add button for Ignore file.

The above will add a .gitignore file with all the proper files ignored for a typical Visual Studio setup. Switch to the Git Changes window and enter a commit message and then click the Commit Staged button to commit the change to your current working branch.

Stop tracking files that should be ignored

To stop tracking the files in the ignore file open a command prompt and navigate to the directory that contains your solution file (.sln) and run the following commands.

git rm -r --cached . 
git add .
git commit -am "Remove ignored files"

The Git commands above were pulled from here. There are other answers in that thread if the above doesn’t work on your project for some reason.

Wrapping Up

It is always simpler if you can start a project with a Git ignore file in place, but if for whatever reason that couldn’t happen hopefully this post will get you going. If you aren’t using the new Visual Studio Git experience then the original version of this post will be more helpful. Check out the Microsoft post for more details on the new Git experience.

Add Git Ignore to an existing Visual Studio Solution (New Git Experience) Read More »

Migration from ASP.NET Core 3.0 to 3.1

On December 3rd .NET Core 3.1 was released which included a new release of ASP.NET Core 3.1 and Entity Framework Core 3.1. This post is going to walk through updating the Contacts API project from the refreshed ASP.NET Basics series. All the changes I made came from Microsoft’s Migrate from ASP.NET Core 3.0 to 3.1 doc.

The code before any changes can be found here.

Installation

If you are a Visual Studio user you can get .NET Core 3.0 by installing at least Visual Studio 16.4. For those not using Visual Studio, you can download and install .NET Core 3.1 SDK from here. As with previous versions, the SDK is available for Windows, Linux, and Mac.

After installation is complete you can run the following command from a command prompt to see all the versions of the .NET Core SDK you have installed.

dotnet --list-sdks

You should see 3.1.100 listed at a minimum.

Project File Changes

Right-click on the project and select Edit projectName.csproj.

Change the TargetFramework to netcoreapp3.1.

Before:
<TargetFramework>netcoreapp3.0</TargetFramework>

After
<TargetFramework>netcoreapp3.1</TargetFramework>

Next, update all your packages to the new versions. This is going to vary greatly based on your project. This can be done manually in the csproj file or via the NuGet UI if you are using Visual Studio. The following are the changes from the sample project.

Before:
<PackageReference Include="Microsoft.EntityFrameworkCore.Design" Version="3.0.0">
<PackageReference Include="Microsoft.EntityFrameworkCore.Sqlite" Version="3.0.0" />
<PackageReference Include="Microsoft.EntityFrameworkCore.SqlServer" Version="3.0.0" />
<PackageReference Include="Microsoft.EntityFrameworkCore.Tools" Version="3.0.0">
<PackageReference Include="Microsoft.Extensions.Logging.Debug" Version="3.0.0" />
<PackageReference Include="Microsoft.IO.RecyclableMemoryStream" Version="1.2.0" />
<PackageReference Include="Microsoft.VisualStudio.Web.CodeGeneration.Design" Version="3.0.0" />
<PackageReference Include="NSwag.AspNetCore" Version="13.1.3" />

After:
<PackageReference Include="Microsoft.EntityFrameworkCore.Design" Version="3.1.0">
<PackageReference Include="Microsoft.EntityFrameworkCore.Sqlite" Version="3.1.0" />
<PackageReference Include="Microsoft.EntityFrameworkCore.SqlServer" Version="3.1.0" />
<PackageReference Include="Microsoft.EntityFrameworkCore.Tools" Version="3.1.0">
<PackageReference Include="Microsoft.Extensions.Logging.Debug" Version="3.1.0" />
<PackageReference Include="Microsoft.IO.RecyclableMemoryStream" Version="1.3.2" />
<PackageReference Include="Microsoft.VisualStudio.Web.CodeGeneration.Design" Version="3.1.0" />
<PackageReference Include="NSwag.AspNetCore" Version="13.1.6" />

Wrapping Up

The move from 3.0 to 3.1 is drop-dead simple which is not surprising since it has only been a few months since the release of 3.0. It is important to move to 3.1 as soon as you can since it is the long term service version and will be supported for at least the next 3 years where 3.0 will lose support within months.

Migration from ASP.NET Core 3.0 to 3.1 Read More »

ASP.NET Core: An attempt was made to access a socket in a way forbidden by its access permissions

This morning I made some changes to a project for a future post. Minor stuff and nothing that should have caused issues, but when I tried to run the project I got the following error from Kestrel.

warn: Microsoft.AspNetCore.Server.Kestrel[0]
Unable to bind to https://localhost:5001 on the IPv4 loopback interface: ‘An attempt was made to access a socket in a way forbidden by its access permissions.’.
warn: Microsoft.AspNetCore.Server.Kestrel[0]
Unable to bind to https://localhost:5001 on the IPv6 loopback interface: ‘An attempt was made to access a socket in a way forbidden by its access permissions.’.
crit: Microsoft.AspNetCore.Server.Kestrel[0]
Unable to start Kestrel.
System.IO.IOException: Failed to bind to address https://localhost:5001.

I had limited time so I switched the project over to launch using IIS Express and hit run, but this resulted in the following error.

HTTP Error 500.35 – ANCM Multiple In-Process Applications in same Process

Switching back to Kestrel and changing the port number in the applicationUrl setting in the launchSettings.json file fixed the issue. Later I came back to the application and tried to track down what was using the same ports and couldn’t find anything. After a reboot, all worked fine with Kestrel and the original port numbers.

For the IIS Express error, I ended up having to delete the .vs directory which can be found in the same directory as your solution file if you are using Visual Studio 2019. Thanks to stackoverflow for this fix.

Wrapping Up

Not the post I set out to write this week, but hopefully this will save someone some searching in the future, more than likely myself.

ASP.NET Core: An attempt was made to access a socket in a way forbidden by its access permissions Read More »

Migration from ASP.NET Core 2.2 to 3.0

On September 23rd .NET Core 3.0 was released including ASP.NET Core 3.0 and Entity Framework Core 3.0. This post will be taking the Contacts project used in the ASP.NET Basics series and migrating it from .NET Core 2.2 to .NET Core 3.0. Most of the information used for this migration comes from the Microsoft docs which will cover way more scenarios than this post will.

The code before any changes can be found in this GitHub repo. A reminder that the Contacts project is the only project being updated with this post the projects in the repo will remain on ASP.NET Core 2.2 for now.

Installation

If you are a Visual Studio user you can get .NET Core 3.0 by installing at least Visual Studio 16.3. For those not using Visual Studio, you can download and install .NET Core 3.0 SDK from here. As with previous versions, the SDK is available for Windows, Linux, and Mac.

After installation is complete you can runt the following command from a command prompt to see all the versions of the .NET Core SDK you have installed.

dotnet --list-sdks

You should see 3.0.100 listed. If you are like me you might also see a few preview versions of the SDK that can be uninstalled at this point.

Project File Changes

Right-click on the project and select Edit projectName.csproj.

Change the TargetFramework to netcoreapp3.0.

Before: 
<TargetFramework>netcoreapp2.2</TargetFramework> 

After: 
<TargetFramework>netcoreapp3.0</TargetFramework>

The packages section has a lot of changes. Microsoft.AspNetCore.App is now gone and part of .NET Core without needing a specific reference. The other thing to note is that Entity Framework Core is no longer “in the box” so you will see a lot of references add to make Entity Framework Core usable.

Before:
<PackageReference Include="Microsoft.AspNetCore.App" />
<PackageReference Include="Microsoft.VisualStudio.Web.CodeGeneration.Design" Version="2.2.0" PrivateAssets="All" />
<PackageReference Include="Swashbuckle.AspNetCore" Version="4.0.1" />

After:
<PackageReference Include="Microsoft.EntityFrameworkCore" Version="3.0.0" />
<PackageReference Include="Microsoft.AspNetCore.Diagnostics.EntityFrameworkCore" Version="3.0.0" />
<PackageReference Include="Microsoft.AspNetCore.Identity.EntityFrameworkCore" Version="3.0.0" />
<PackageReference Include="Microsoft.AspNetCore.Identity.UI" Version="3.0.0" />
<PackageReference Include="Microsoft.EntityFrameworkCore.SqlServer" Version="3.0.0" />
<PackageReference Include="Microsoft.EntityFrameworkCore.Tools" Version="3.0.0" />
<PackageReference Include="Microsoft.VisualStudio.Web.CodeGeneration.Design" Version="3.0.0" PrivateAssets="All" />
<PackageReference Include="Swashbuckle.AspNetCore" Version="5.0.0-rc4" />

The last thing to note is that Swashbuckle doesn’t have a final version ready for .NET Core 3 so you will have to make sure you are using version 5 rc2 at a minimum.

The following is my full project file for reference.

<Project Sdk="Microsoft.NET.Sdk.Web">

  <PropertyGroup>
    <TargetFramework>netcoreapp3.0</TargetFramework>
    <AspNetCoreHostingModel>InProcess</AspNetCoreHostingModel>
    <UserSecretsId>aspnet-Contacts-cd2c7b27-e79c-43c7-b3ef-1ecb04374b70</UserSecretsId>
  </PropertyGroup>

  <ItemGroup>
    <PackageReference Include="Microsoft.EntityFrameworkCore" Version="3.0.0" />
    <PackageReference Include="Microsoft.AspNetCore.Diagnostics.EntityFrameworkCore" Version="3.0.0" />
    <PackageReference Include="Microsoft.AspNetCore.Identity.EntityFrameworkCore" Version="3.0.0" />
    <PackageReference Include="Microsoft.AspNetCore.Identity.UI" Version="3.0.0" />
    <PackageReference Include="Microsoft.EntityFrameworkCore.SqlServer" Version="3.0.0" />
    <PackageReference Include="Microsoft.EntityFrameworkCore.Tools" Version="3.0.0" />
    <PackageReference Include="Microsoft.VisualStudio.Web.CodeGeneration.Design" Version="3.0.0" PrivateAssets="All" />
    <PackageReference Include="Swashbuckle.AspNetCore" Version="5.0.0-rc4" />
  </ItemGroup>

</Project>

Program Changes

In Program.cs some changes to the way the host is constructed. The over version may or may not have worked, but I created a new app and pulled this out of it just to make sure I’m using the current set up.

using Microsoft.AspNetCore.Hosting;
using Microsoft.Extensions.Hosting;

namespace Contacts
{
    public class Program
    {
        public static void Main(string[] args)
        {
            CreateHostBuilder(args).Build().Run();
        }

        public static IHostBuilder CreateHostBuilder(string[] args) =>
            Host.CreateDefaultBuilder(args)
                .ConfigureWebHostDefaults(webBuilder =>
                                          {
                                              webBuilder.UseStartup<Startup>();
                                          });
    }
}

Startup Changes

In Startup.cs we have quite a few changes to make. As long as you haven’t do any customization in the constructor you can replace it with the following.

public Startup(IConfiguration configuration)
{
    Configuration = configuration;
}

Next, they type on the configuration property changed from IConfigurationRoot to IConfiguration.

Before:
public IConfigurationRoot Configuration { get; }

After:
public IConfiguration Configuration { get; }

Moving on to the ConfigureServices function has a couple of changes to make. The first is a result of updating to the newer version of the Swagger package where the Info class has been replaced with OpenApiInfo.

Before:
services.AddSwaggerGen(c =>
{
    c.SwaggerDoc("v1", new Info { Title = "Contacts API", Version = "v1"});
});

After:
services.AddSwaggerGen(c =>
{
    c.SwaggerDoc("v1",  new OpenApiInfo { Title = "Contacts API", Version = "v1" })
});

Next, we are going to move from using UserMvc to the new AddControllersWithViews which is one of the new more targeted ways to add just the bits of the framework you need.

Before:
services.AddMvc().SetCompatibilityVersion(CompatibilityVersion.Version_2_2);

After:
services.AddControllersWithViews();

Now in the Configure function, the function signature needs to be updated and the logging factory bits removed. If you do need to configure logging that should be handled as part of the HostBuilder.

Before:
public void Configure(IApplicationBuilder app, IHostingEnvironment env, ILoggerFactory loggerFactory)
{
    loggerFactory.AddConsole(Configuration.GetSection("Logging"));
    loggerFactory.AddDebug();

After:
public void Configure(IApplicationBuilder app, IWebHostEnvironment env)
{

For the next set of changes, I’m just going to show the result and not the before. The UseCors may or may not apply but the addition of UserRouting and the replacement of UseMvc with UserEndpoint will if you want to use the new endpoint routing features.

app.UseStaticFiles();
app.UseRouting();

app.UseCors(builder =>
            {
                builder.AllowAnyHeader();
                builder.AllowAnyMethod();
                builder.AllowAnyOrigin();
            }
           );

app.UseAuthentication();
app.UseAuthorization();

app.UseEndpoints(endpoints =>
                 {
                     endpoints.MapControllerRoute(
                                                  name: "default",
                                                  pattern: "{controller=Home}/{action=Index}/{id?}");
                     endpoints.MapRazorPages();
                 });

Other Miscellaneous Changes

The only other change I had was the removal of @using Microsoft.AspNetCore.Http.Authentication in a few cshtml files related to login.

Wrapping Up

The migration from 2.2 to 3.0 is a bit more involved than the move from 2.1 to 2.2, but that isn’t surprising with all the changes in this release. Remember to check out the official migration guide for more details.

The code for the Contacts project after the above changes can be found on GitHub.

Migration from ASP.NET Core 2.2 to 3.0 Read More »

Create an Azure Function App from Visual Studio

When I started looking at Azure Function Apps in the post, Azure Functions Introduction, I used the Azure Portal to create the sample function App used in the post. On the follow-up post, Open an Azure Portal Created Function in Visual Studio, I showed how to get a portal created function to open in Visual Studio. The code download from the Azure Portal was in the csx format instead of the cs format that Visual Studio normally deals with so a lot of Visual Studio doesn’t work.

This post is going to walk through creating a new Azure Function App from within Visual Studio. My hope is that starting from Visual Studio will result in code that is more Visual Studio friendly. This post will be using Visual Studio 2019.

App Creation

Open Visual Studio and click  Create a new project on the start dialog.

On the next screen search from Azure Functions. Click on the Azure Functions item and click the Next button.

Enter a Project name, and change any other settings if needed, then click Create.

The next dialog will ask for the type of trigger to use. To match the function we created a few weeks ago on the Azure Portal we are going to use an Http trigger and click Create.

Clicking the last Create button will kick off the project creation process. When done you will have a project with a single function that will match the following inside of the file Function1.cs.

public static class Function1
{
    [FunctionName("Function1")]
    public static async Task<IActionResult> Run(
        [HttpTrigger(AuthorizationLevel.Function, "get", "post", Route = null)] HttpRequest req,
        ILogger log)
    {
        log.LogInformation("C# HTTP trigger function processed a request.");

        string name = req.Query["name"];

        string requestBody = await new StreamReader(req.Body).ReadToEndAsync();
        dynamic data = JsonConvert.DeserializeObject(requestBody);
        name = name ?? data?.name;

        return name != null
            ? (ActionResult)new OkObjectResult($"Hello, {name}")
            : new BadRequestObjectResult("Please pass a name on the query string or in the request body");
    }
}

The following is the Portal created function from a few weeks ago.

public static async Task<IActionResult> Run(HttpRequest req, ILogger log)
{
    log.LogInformation("C# HTTP trigger function processed a request.");

    string name = req.Query["name"];

    string requestBody = await new StreamReader(req.Body).ReadToEndAsync();
    dynamic data = JsonConvert.DeserializeObject(requestBody);
    name = name ?? data?.name;

    return name != null
        ? (ActionResult)new OkObjectResult($"Hello, {name}")
        : new BadRequestObjectResult("Please pass a name on the query string or in the request body");
}

You will notice that the body of the two is the same. The Visual Studio version is using attributes to let Azure know the name, the trigger type, and other information that will be needed once the function is published to Azure.

Local Testing

One really neat thing about using Visual Studio for your function development is you can debug them locally. If you hit the play button (or F5) Visual Studio will launch your function locally. You will see something like the following.

Highlighted is the section listing all the Http Functions in the applications along with URLs that can be used to test them. For this example, the following URL could be used to get the response “Hello, Eric”.

http://localhost:7071/api/Function1?name=Eric

As far as I have seen so far all the normal debugging features of Visual Studio seem to work when running a function locally.

App Publication

Now that we have created and tested our Function App locally it is time to publish it to Azure. Right-click on the project file in Solution Explorer and click Publish.

On the Publish dialog, we are going to Create New and Run from package file since it is recommended (see the docs for why it is recommended). Finally, click the Publish button.

The next dialog is the configuration for the App Service that will be created in Azure. You can take the defaults and hit Create, but I always take the extra time to create a new resource group so that my samples are easy to remove when I am done with them.

Clicking the create button will start the deployment to Azure which will take a few minutes. After the deployment, you can use the Azure Portal to test your Function App. More information on running a function from the Azure Portal can be found in the Azure Functions Introduction post.

Wrapping Up

While creating a function via the Azure Portal is the fastest way to get started, I would recommend you start locally. The slightly longer getting started time it worth it for the better tooling and flexibility it provides.

Create an Azure Function App from Visual Studio Read More »

Open an Azure Portal Created Function in Visual Studio

In last week’s post, Azure Functions Introduction, we created a new Azure Function App with a single function triggered via HTTP. The Portal is great for the initial creation of a function, but what happens when your needs change? For instance, you might want to store your functions in a repo with the rest of the code for your application. In this post, we are going to walk through taking our portal created function and getting it downloaded where it can be edited in Visual Studio.

Download App Content

From the Azure Portal select App Services.

Next, select the Function App you want to get the code for.

The detail of the Function App will load and at the top of the screen click on the Download app content option.

On the popup that shows select Content and Visual Studio Project and then click the Download button.

Once clicking download you will get a zip file containing everything in your Function App. Extract the files and double click the project file to open it in Visual Studio.

Changing a Function

The project will have a folder per function that exist in your applications. In our example, you would see a HttpTrigger1 directory and inside that directory, the code for the actual function is in the run.csx file.  Looking at the code you will see that it is the same that you would have seen in the portal. Here is the code.

#r "Newtonsoft.Json"

using System.Net;
using Microsoft.AspNetCore.Mvc;
using Microsoft.Extensions.Primitives;
using Newtonsoft.Json;

public static async Task<IActionResult> Run(HttpRequest req, ILogger log)
{
    log.LogInformation("C# HTTP trigger function processed a request.");

    string name = req.Query["name"];

    string requestBody = await new StreamReader(req.Body).ReadToEndAsync();
    dynamic data = JsonConvert.DeserializeObject(requestBody);
    name = name ?? data?.name;

    return name != null
        ? (ActionResult)new OkObjectResult($"Hello, {name}")
        : new BadRequestObjectResult("Please pass a name on the query string or in the request body");
}

At this point, you could change anything you wanted about the application. I’m going to change the return value.

Before:
(ActionResult)new OkObjectResult($"Hello, {name}")

After:
(ActionResult)new OkObjectResult($"Yo, {name}")

Pushing Changes back to Azure

Now that we have a change to our function how do we get that change back to Azure? Head back to the overview page for your Azure Function App and click the Get publish profile link.

In Visual Studio right-click on the project and select Publish.

In the publish dialog click the Import Profile button and select the profile you download from Azure.

Once the profile is imported you can then click the Publish button to push any changes to your Azure Function App.

At this point, if you execute your function you should see the changes you made in Visual Studio.

Wrapping Up

While the above works it isn’t actually very friendly in Visual Studio since the function is a csx file instead of a cs file that normal C# uses. For next week look for an example of starting a function app from Visual Studio to see if it results in a project that will be easier to maintain.

Open an Azure Portal Created Function in Visual Studio Read More »

Deploy ASP.NET Core 3 Previews to Azure App Using Extensions

A few weeks ago when the post Deploy ASP.NET Core 3 Previews to Azure App Service I got an email from Jerrie Pelser who pointed out that there are extensions available for App Service that allow usage of the public previews of ASP.NET Core 3 without having to do a self-contained deployment.

In addition to Jerrie’s suggestion pajaybasu pointed out in this Reddit post that using Docker is another option. Pajaybasu also pointed out a line in the original post where I that self-contained deployments were the only option which of course was incorrect.

The first half of this post is going to be the same as the original post which covers the creation and the initial publication to Azure App Service. The last half will cover using an extension to enable the preview version of ASP.NET Core.

Sample Application

I used the following .NET CLI command to create a new ASP.NET Core application using React for its front end.

dotnet new react

After the creation process is complete open the project in Visual Studio. I highly recommend using the Visual Studio 2019 preview release when working with any .NET Core 3 applications.

Publish to App Service

In Visual Studio’s Solution Explorer right click on the project file and select Publish.

Select App Service for the publish target. Here we are creating a new app service. Next, click Publish.

The next dialog if the information about the new App Service that will be created. I took the defaults for the most part. I did create a new resource group for this application to make the resources easier to clean up in the future. I also changed the hosting plan to the free tier. Click Create to continue.

The Error and the Warning

As part of the publishing process, a browser will be opened to the address of the application. When this happens you will see an error about ANCM In-Process Handler Load Failure (if you are using IIS In-Process Hosting).

If you look back at Visual Studio you will see the following warning that your application requires the .NET Core runtime 3.0 and App Service only supports up to 2.2. Since we are going to fix this in App Service I recommend selecting Don’t perform check in the future (only this profile).

Another Fix

For this version of the fix, go to your App Service in the Azure Portal. In the menu under the Development Tools select the Extensions option.

On the next page click the Add button at the top. Click on the Choose Extension and select the ASP.NET Core 3.0 (x86) Runtime option.

Next, click Legal Terms, read the terms and if you are OK with the terms then click the OK button. You will then have to click OK on the add extension blade which will start the extension installation.

If you were to load your site at this point you would still get the 500 error. Under Settings click the Configuration and click on General settings turn Web sockets On and click Save.

At this point, your site should be working. You can also go back and turn web sockets back off and the site will continue working. I have no idea what toggling web sockets does to make everything start working, but thanks to this comment on a GitHub issue for the key to getting this working.

Wrapping Up

Hopefully, between this post and the previous one using a self-contained deployment, you won’t have any issues trying out the .NET Core 3 with App Service.

Deploy ASP.NET Core 3 Previews to Azure App Using Extensions Read More »

Add Application Insights to an Existing ASP.NET Core Application

I have been using Azure’s App Service to host the web applications I am playing around with for a few years now. The service makes it simple to get an application hosted. Today I decided to try out Application Insights which is an application performance management (APM) service provided by Azure which integrates very well with App Service. In fact, you can enable Application Insights for your App Service Application without the need to make any code changes.

This post is going to cover using an existing App Service application and enabling Application Insights. This post is assuming that you already have an Azure account. If you don’t you can sign up for a free Azure account.

Sample Application and App Service Creation

In case you don’t have an existing application in Azure App Service here is a quick walkthrough of the application I used for this post. If you have an existing application you can skip to the next section.

From the .NET CLI I used the following command to create a global.json targeting .NET Core 2.2 in the directory the application is being created in. You don’t have to do this step, but I needed it because I have .NET Core 3 preview installed and I wanted this post to target the current production release of .NET Core.

dotnet new globaljson --sdk-version 2.2.105

Next, run the following command to create a new ASP.NET Core application using the React template. Any of the templates are fine so feel free to use a different one as long as it will give you a web application.

dotnet new react

Now open the new project in Visual Studio and right-click on the project file and click Publish.

Select App Service and then click Publish.

The next dialog is all about the setup of your App Service. I took the defaults for the most part, with the exception of the Resource Group which I made sure to create one just for this application to allow for easy clean up later. When you have all your options selected click Create. Note that there is an option to setup Application Insights from this screen, but we are going to handle this on the Azure side after the fact for this post.

After the deployment is done your application should open up in a browser.

Add Application Insights from the Azure Portal

Now that we have an application running in an Azure App Service we are ready to add in Application Insights. First head to the Azure Portal and select App Services from the menu.

From your list of App Services select the one you want to add Application Insights to. From the menu select Application Insights. In the details click the Turn on site extension button to update the Application Insights extension if needed.

On the next screen select the Location where you would like the Application Insights deployed. You can tweak what will be instrumented based on the language your application is built in, I just kept the defaults. When all your selections are done click Apply.

When you click apply, you will get a warning that your site will have to be restarted. For a test application, this isn’t a big deal, but if you are on a production application you might want to do this during a slow period. Click Yes to continue.

After the process is complete click the View Application Insights data link to view your Application Insights Overview.

The overview will give you a fast overview of how your application is doing with graphs of Failed request, Server response time, Server requests, and Availability.

Wrapping Up

Hopefully, this will help you get going with Application Insights. This post didn’t cover many of the features that Application Insights provides, but should get you set up so you can explore all the features the service provides.

Add Application Insights to an Existing ASP.NET Core Application Read More »

Deploy ASP.NET Core 3 Previews to Azure App Service

I have found some time to play around with some of the features coming with ASP.NET Core 3 and I needed a place to host some of the applications I’m playing around with. Azure App Services has always been a great place for this type of thing, but as you will see in the details below it doesn’t support ASP.NET Core 3 by default currently.

This post is going to walk through creating a new ASP.NET Core 3 React application and publishing it to a new App Service with the default setting and then show you what to change to get the application to run.

Sample Application

I used the following .NET CLI command to create a new ASP.NET Core application using React for its front end.

dotnet new react

After the creation process is complete open the project in Visual Studio. I highly recommend using the Visual Studio 2019 preview release when working with any .NET Core 3 applications.

Publish to App Service

In Visual Studio’s Solution Explorer right click on the project file and select Publish.

Select App Service for the publish target. Here we are creating a new app service. Next, click Publish.

The next dialog if the information about the new App Service that will be created. I took the defaults for the most part. I did create a new resource group for this application to make the resources easier to clean up in the future. I also changed the hosting plan to the free tier. Click Create to continue.

The Error and the Warning

As part of the publishing process, a browser will be opened to the address of the application. When this happens you will see an error about ANCM In-Process Handler Load Failure (if you are using IIS In-Process Hosting).

If you look back at Visual Studio you will see the following warning that your application requires the .NET Core runtime 3.0 and App Service only supports up to 2.2.

The Fix

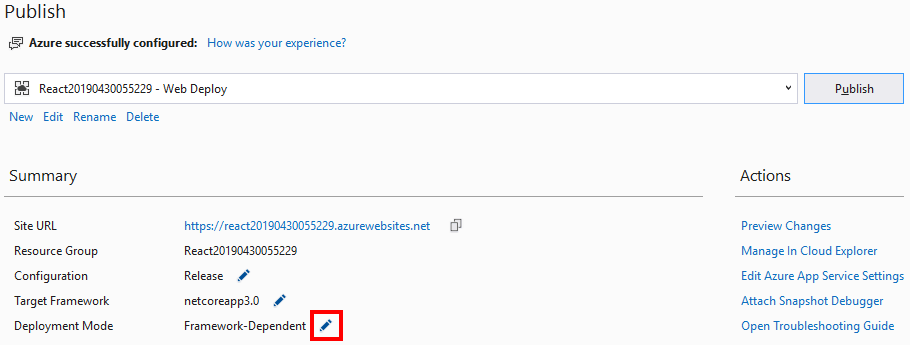
After dismissing the dialog above you will see a summary of the publish profile we created above. Click the Pincel next to the Framework-Dependent value for Deployment Mode.

In the dialog that pops up set the Deployment Mode to Self-Contained and select an appropriate Target Runtime for your App Service. In the case of this sample which is deployed to a Windows App Service, we are using win-x86.

Back on the publish profile summary screen click the Publish button to redeploy the application to App Service with the new settings. When the process finishes this time you should see a browser load with your application running properly.

Wrapping Up

This is a great example of the power of being able to do self-contained deployments. If this option didn’t exist then we would have no option for running .NET Core 3 applications on App Service.

Deploy ASP.NET Core 3 Previews to Azure App Service Read More »

Create React or Angular Application from Visual Studio with Authentication

Having templates that provide a good starting point for a new application is an important part of the value that is provided by Microsoft. Nothing kills progress faster than having to spend a week trying to discover the recommended way to set up a project. Thankfully template is an area that Microsoft continues to invest in.

A few weeks ago in my ASP.NET Core 3: React Template with Auth post I went over creating a React application that included auth out of the box using the .NET CLI. In this post, we are going to create an Angular application with Auth from Visual Studio.

Required Installs

As of this writing .NET Core 3 Preview 4 was just released so please make sure you have the latest preview installed. Also, make sure and install the latest preview of Visual Studio. The screenshots in this post will be from the Visual Studio 2019 16.1.0 Preview 1 release. Make sure you have at least the ASP.NET and web development workload installed.

Project Creation

Open Visual Studio and from the Get started area on the left click Create a new project.

On the next screen select the ASP.NET Core Web Application project type and click Next.

On the next screen at a minimum enter a Project name and click the Create button.

On the next screen select the template you want to use. I will be selecting Angular, but the same authentication setup will work for React or React and Redux templates. After selecting your template type on the right side of the screen under Authentication click the Change link.

Select Individual User Accounts and click OK.

After the Change Authentication dialog closes click the Create button on the template selection dialog.

After a couple of minutes, the application will be ready to go. The only other step you will need to do is to apply the Entity Framework migrations. This can be done from the .NET CLI or the first time you try to register an account in debug mode you will be prompted to apply the migrations.

Wrapping Up

I’m not sure if I am alone in this or not, but I get super excited seeing the time being invested by Microsoft in making the getting started experiences better with every release. Having authentication available out of the box for a SAP backed by an API make getting started on a project super simple.

Create React or Angular Application from Visual Studio with Authentication Read More »