ASP.NET Core

ASP.NET Core Server-Side Blazor with Authentication

It has been close to a year since I did my first into post on Blazor, ASP.NET Core Basics: Blazor, and a lot has changed. The biggest thing is that it was announced that Server-Side Blazor is going to ship with .NET Core 3. This post is going to walk through creating a server-side Blazor application including authentication.

Sever-Side Blazor

What is server-side Blazor and how is it different from client-side Blazor? The quick answer is that client-side Blazor uses WebAssembly and Mono to run .NET code in the browser allowing for basically a SPA written in .NET. With Server-Side Blazor the app is executed on the server and update/processing are requested over a SignalR connection.

For a deeper dive into the differences check out the ASP.NET Core Blazor hosting models doc.

Pre-requisites

To start make sure to install at least preview 6 of .NET Core 3. Using a command prompt you can run the following command to see which versions of the .NET Core SDK are installed.

dotnet --list-sdks

The previews of .NET Core 3 can be downloaded from here. Also, make sure to use the latest preview of Visual Studio 2019.

Application Creation

I used the following command from the command prompt to create a new Blazor application using individual authentication.

dotnet new blazorserverside --auth Individual

Visual Studio also has the template available if you select the ASP.NET Core Web Application project type and about three screens in select the Blazor Server App option.

After the creation process is complete open the project in Visual Studio. At this point, if you run the application you will see the standard options to log in or register.

Requiring Auth for a Page

At this point, the application allows account creation and login, but all pages are available to all user, even if they aren’t logged in. There are multiple ways to deal with this. For this post, I’m going with the closest to what I am used to from MVC which is using an Authorize attribute. In the Pages directory open then FetchData.razor file and make the following changes to make the page require the user to be authorized. Note that this method should only be used on page components.

Before:

@page "/fetchdata"
@using BlazorAuth.Data
@inject WeatherForecastService ForecastService

After:

@page "/fetchdata"
@using BlazorAuth.Data
@using Microsoft.AspNetCore.Authorization
@attribute [Authorize]
@inject WeatherForecastService ForecastService

Now if you go to the Fetch data page without being logged in you will see a Not authorized message. This message can be customized using the AuthorizeView component. You can find more details in the docs.

Wrapping Up

It is neat seeing how far Blazor has come since I last played with it. The docs are great and the product has improved a ton. I may do a follow-up post to go more into how to use the AuthorizeView component.

Make sure to check out the official docs on Blazor authentication and authorization to get the full picture of the subject.

ASP.NET Core Server-Side Blazor with Authentication Read More »

Deploy ASP.NET Core 3 Previews to Azure App Using Extensions

A few weeks ago when the post Deploy ASP.NET Core 3 Previews to Azure App Service I got an email from Jerrie Pelser who pointed out that there are extensions available for App Service that allow usage of the public previews of ASP.NET Core 3 without having to do a self-contained deployment.

In addition to Jerrie’s suggestion pajaybasu pointed out in this Reddit post that using Docker is another option. Pajaybasu also pointed out a line in the original post where I that self-contained deployments were the only option which of course was incorrect.

The first half of this post is going to be the same as the original post which covers the creation and the initial publication to Azure App Service. The last half will cover using an extension to enable the preview version of ASP.NET Core.

Sample Application

I used the following .NET CLI command to create a new ASP.NET Core application using React for its front end.

dotnet new react

After the creation process is complete open the project in Visual Studio. I highly recommend using the Visual Studio 2019 preview release when working with any .NET Core 3 applications.

Publish to App Service

In Visual Studio’s Solution Explorer right click on the project file and select Publish.

Select App Service for the publish target. Here we are creating a new app service. Next, click Publish.

The next dialog if the information about the new App Service that will be created. I took the defaults for the most part. I did create a new resource group for this application to make the resources easier to clean up in the future. I also changed the hosting plan to the free tier. Click Create to continue.

The Error and the Warning

As part of the publishing process, a browser will be opened to the address of the application. When this happens you will see an error about ANCM In-Process Handler Load Failure (if you are using IIS In-Process Hosting).

If you look back at Visual Studio you will see the following warning that your application requires the .NET Core runtime 3.0 and App Service only supports up to 2.2. Since we are going to fix this in App Service I recommend selecting Don’t perform check in the future (only this profile).

Another Fix

For this version of the fix, go to your App Service in the Azure Portal. In the menu under the Development Tools select the Extensions option.

On the next page click the Add button at the top. Click on the Choose Extension and select the ASP.NET Core 3.0 (x86) Runtime option.

Next, click Legal Terms, read the terms and if you are OK with the terms then click the OK button. You will then have to click OK on the add extension blade which will start the extension installation.

If you were to load your site at this point you would still get the 500 error. Under Settings click the Configuration and click on General settings turn Web sockets On and click Save.

At this point, your site should be working. You can also go back and turn web sockets back off and the site will continue working. I have no idea what toggling web sockets does to make everything start working, but thanks to this comment on a GitHub issue for the key to getting this working.

Wrapping Up

Hopefully, between this post and the previous one using a self-contained deployment, you won’t have any issues trying out the .NET Core 3 with App Service.

Deploy ASP.NET Core 3 Previews to Azure App Using Extensions Read More »

Azure Application Insights Overview

In the Add Application Insights to an Existing ASP.NET Core Application post from last week, we got Application Insights up and running. This week my plan was to show off some of the features of Application Insights. It turns out this is hard to do in a meaningful way when your application isn’t getting any usage. While I have next to no data for most of the screenshots I still want to point out some of the areas of Application Insights that seem like they would be very useful.

Sample Application

For the most part, the post linked above is a good starting point with the exception of instead of using a React application I switched out for a Razor Pages application. The following is the command to create a Razor Page application with auth using the .NET CLI.

dotnet new webapp --auth Individual

The reason for this change was to get more items in App Insights since Razor Pages makes a request to the server per page.

Application Dashboard

The first item I recommend you check out is the Application Dashboard. On the Azure Portal select your App Insights resource and at the top click Application Dashboard.

This link will drop you on a page that will let you see how your application is doing at a glance. This includes everything from Unique sessions and Failed requests to Average I/O rate and Average available memory.

Live Metrics Stream

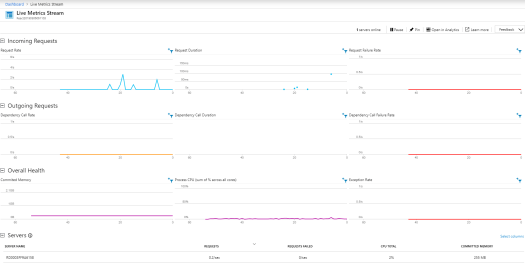
From your application dashboard or the App Insights menu you if you select Live Metrics Stream you will see real-time information about Incoming Requests, Outgoing Request, Overall Health, and a list of servers your application is running on and some stats about your usage on those servers.

Investigate

As a developer, a lot of the items in the Investigate menu jump out to me as being really helpful.

For example, Failures will give you a graph of failures over your selected timeframe with a list of the failed operations and a summary of the top 3 failed response codes, exception types, and dependency failures. The following screenshot is what it looks like, but my sample application doesn’t have any failures so it may not be super helpful.

The other option I want to point out is Performance which will give you a great summary of how your application is performing with break down by operation. This operation level view is a great place to spot areas in your application that may need some perf work.

Wrapping Up

This post covered a small fraction of the value provided by Application Insights. I encourage you to give the service a try especially if you are running a .NET application and most of the value can be provided without having to make any code changes.

Azure Application Insights Overview Read More »

Add Application Insights to an Existing ASP.NET Core Application

I have been using Azure’s App Service to host the web applications I am playing around with for a few years now. The service makes it simple to get an application hosted. Today I decided to try out Application Insights which is an application performance management (APM) service provided by Azure which integrates very well with App Service. In fact, you can enable Application Insights for your App Service Application without the need to make any code changes.

This post is going to cover using an existing App Service application and enabling Application Insights. This post is assuming that you already have an Azure account. If you don’t you can sign up for a free Azure account.

Sample Application and App Service Creation

In case you don’t have an existing application in Azure App Service here is a quick walkthrough of the application I used for this post. If you have an existing application you can skip to the next section.

From the .NET CLI I used the following command to create a global.json targeting .NET Core 2.2 in the directory the application is being created in. You don’t have to do this step, but I needed it because I have .NET Core 3 preview installed and I wanted this post to target the current production release of .NET Core.

dotnet new globaljson --sdk-version 2.2.105

Next, run the following command to create a new ASP.NET Core application using the React template. Any of the templates are fine so feel free to use a different one as long as it will give you a web application.

dotnet new react

Now open the new project in Visual Studio and right-click on the project file and click Publish.

Select App Service and then click Publish.

The next dialog is all about the setup of your App Service. I took the defaults for the most part, with the exception of the Resource Group which I made sure to create one just for this application to allow for easy clean up later. When you have all your options selected click Create. Note that there is an option to setup Application Insights from this screen, but we are going to handle this on the Azure side after the fact for this post.

After the deployment is done your application should open up in a browser.

Add Application Insights from the Azure Portal

Now that we have an application running in an Azure App Service we are ready to add in Application Insights. First head to the Azure Portal and select App Services from the menu.

From your list of App Services select the one you want to add Application Insights to. From the menu select Application Insights. In the details click the Turn on site extension button to update the Application Insights extension if needed.

On the next screen select the Location where you would like the Application Insights deployed. You can tweak what will be instrumented based on the language your application is built in, I just kept the defaults. When all your selections are done click Apply.

When you click apply, you will get a warning that your site will have to be restarted. For a test application, this isn’t a big deal, but if you are on a production application you might want to do this during a slow period. Click Yes to continue.

After the process is complete click the View Application Insights data link to view your Application Insights Overview.

The overview will give you a fast overview of how your application is doing with graphs of Failed request, Server response time, Server requests, and Availability.

Wrapping Up

Hopefully, this will help you get going with Application Insights. This post didn’t cover many of the features that Application Insights provides, but should get you set up so you can explore all the features the service provides.

Add Application Insights to an Existing ASP.NET Core Application Read More »

Deploy ASP.NET Core 3 Previews to Azure App Service

I have found some time to play around with some of the features coming with ASP.NET Core 3 and I needed a place to host some of the applications I’m playing around with. Azure App Services has always been a great place for this type of thing, but as you will see in the details below it doesn’t support ASP.NET Core 3 by default currently.

This post is going to walk through creating a new ASP.NET Core 3 React application and publishing it to a new App Service with the default setting and then show you what to change to get the application to run.

Sample Application

I used the following .NET CLI command to create a new ASP.NET Core application using React for its front end.

dotnet new react

After the creation process is complete open the project in Visual Studio. I highly recommend using the Visual Studio 2019 preview release when working with any .NET Core 3 applications.

Publish to App Service

In Visual Studio’s Solution Explorer right click on the project file and select Publish.

Select App Service for the publish target. Here we are creating a new app service. Next, click Publish.

The next dialog if the information about the new App Service that will be created. I took the defaults for the most part. I did create a new resource group for this application to make the resources easier to clean up in the future. I also changed the hosting plan to the free tier. Click Create to continue.

The Error and the Warning

As part of the publishing process, a browser will be opened to the address of the application. When this happens you will see an error about ANCM In-Process Handler Load Failure (if you are using IIS In-Process Hosting).

If you look back at Visual Studio you will see the following warning that your application requires the .NET Core runtime 3.0 and App Service only supports up to 2.2.

The Fix

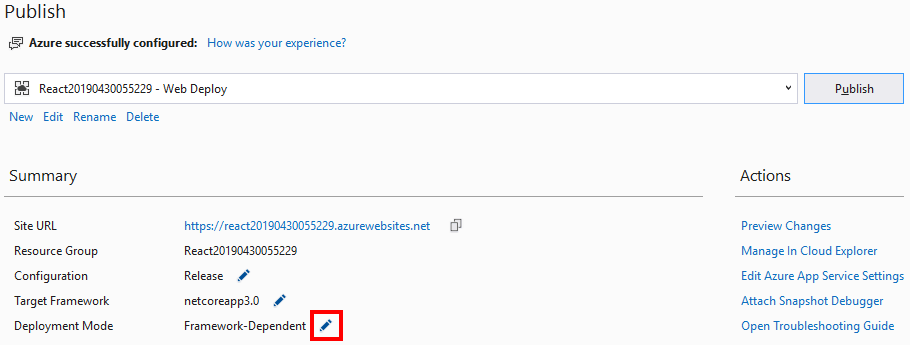
After dismissing the dialog above you will see a summary of the publish profile we created above. Click the Pincel next to the Framework-Dependent value for Deployment Mode.

In the dialog that pops up set the Deployment Mode to Self-Contained and select an appropriate Target Runtime for your App Service. In the case of this sample which is deployed to a Windows App Service, we are using win-x86.

Back on the publish profile summary screen click the Publish button to redeploy the application to App Service with the new settings. When the process finishes this time you should see a browser load with your application running properly.

Wrapping Up

This is a great example of the power of being able to do self-contained deployments. If this option didn’t exist then we would have no option for running .NET Core 3 applications on App Service.

Deploy ASP.NET Core 3 Previews to Azure App Service Read More »

Create React or Angular Application from Visual Studio with Authentication

Having templates that provide a good starting point for a new application is an important part of the value that is provided by Microsoft. Nothing kills progress faster than having to spend a week trying to discover the recommended way to set up a project. Thankfully template is an area that Microsoft continues to invest in.

A few weeks ago in my ASP.NET Core 3: React Template with Auth post I went over creating a React application that included auth out of the box using the .NET CLI. In this post, we are going to create an Angular application with Auth from Visual Studio.

Required Installs

As of this writing .NET Core 3 Preview 4 was just released so please make sure you have the latest preview installed. Also, make sure and install the latest preview of Visual Studio. The screenshots in this post will be from the Visual Studio 2019 16.1.0 Preview 1 release. Make sure you have at least the ASP.NET and web development workload installed.

Project Creation

Open Visual Studio and from the Get started area on the left click Create a new project.

On the next screen select the ASP.NET Core Web Application project type and click Next.

On the next screen at a minimum enter a Project name and click the Create button.

On the next screen select the template you want to use. I will be selecting Angular, but the same authentication setup will work for React or React and Redux templates. After selecting your template type on the right side of the screen under Authentication click the Change link.

Select Individual User Accounts and click OK.

After the Change Authentication dialog closes click the Create button on the template selection dialog.

After a couple of minutes, the application will be ready to go. The only other step you will need to do is to apply the Entity Framework migrations. This can be done from the .NET CLI or the first time you try to register an account in debug mode you will be prompted to apply the migrations.

Wrapping Up

I’m not sure if I am alone in this or not, but I get super excited seeing the time being invested by Microsoft in making the getting started experiences better with every release. Having authentication available out of the box for a SAP backed by an API make getting started on a project super simple.

Create React or Angular Application from Visual Studio with Authentication Read More »

Azure B2C: User Profiles

In this post, we will be adding access to user profiles using Azure B2C. We will be building on the setup used in the ASP.NET Core with Azure B2C Auth post so make sure and check it out if something in this post isn’t clear. The following is the full list of post from what has turned in to a series on Azure B2C.

ASP.NET Core with Azure B2C Auth
Azure B2C: Customize Layouts
Azure B2C: Social Logins

User Profile Flow

The first step to enabling profile access is to add the Profile editing user flow. From the menu for your Azure B2C resource select User flows.

At the top of the list of user flows click the New user flow button. This will display a list of recommended flows to add. From the list click Profile editing.

On the Create page enter a Name for your flow, select which Identity providers can use the flow, select which User attributes to collect/display, and then create the Create button. The user attributes you select will control which fields show when the user is editing their profile. Also, notice the Show more link which will give you a full list of the user attributes available on your account.

Sample Application

Back in the sample application in the appsettings.json file enter the name of the profile editing user flow from above for the EditProfilePolicyId.

"EditProfilePolicyId": "B2C_1_Profile"

Run the application and after login, the user’s name will be a link which will take them to a page where they can edit their profile information.

The following is a sample of what the profile page looks like.

Tweaking the Layout

From the screenshot, you will notice that the order of the fields wouldn’t make a lot of sense to a user. Thankfully B2C provides a way to customize the order of files, labels, control types, etc. without doing a full custom page which is also an option if you need to match an existing application’s look and feel.

From the B2C menu, select User flows and click on your profile flow. Once in your profile flow select Page layouts and then in the details select Profile edit page.

You will see something similar to the following screenshot. As you can see it allows reordering of fields, label changes, etc.

User Attributes

If the built-in user attributes don’t cover all your needs B2C does allow you to add your own attributes. From the main menu of B2C click on User attributes and you will see a list of your current attributes as well as an Add button if you need a custom attribute.

Wrapping Up

Enabling profile access was a pretty easy process and the flexibility provided with the built-in customizations is nice. I’m betting that most people will end up using a custom layout to give users a consistent experience. If you need help getting started with a custom layout check out my Azure B2C: Customize Layouts post.

Azure B2C: User Profiles Read More »

Azure B2C: Social Logins

This post is going to cover enabling a social login for a site using Azure B2C for authentication. If you are new to this set of posts you can find the initial setup of the sample application in the  ASP.NET Core with Azure B2C Auth post. I would also recommend checking out the Azure B2C: Customize Layouts to learn how to change the provided UI to provide your users with a consistent look and feel that matches the rest of your application.

Social Login Provider Setup

Azure B2C supports most of the login provides you would expect such as Google, Facebook, Twitter, Microsoft, etc. as well as any provider that supports OpendID Connect. No matter which option you pick you will have to register/signup your application with the provider. Unfortunately, Azure B2C doesn’t provide links to the registration pages of the services it supports so it is up to you to find those yourself.

For this example, I’m going to be walking through the process using Google. You can get all the details of Google’s OpenID Connect offering in their docs. To get started we need to set up our application in the developer console. The link will take you to the dashboard where you will see a message about selecting or creating a new project. Click the Create link. In the next page enter the Project name and click Create.

After the creation process finishes click Credentials from the navigation menu on the left.

On the top of the screen select OAuth consent screen. On this page, you will need to at least enter an Application name and an Authorized domain of b2clogin.com (not shown in the screenshot, but still required) and click the Save button at the bottom of the page.

Next, select the Credentials tab and click the Create credentials button and select the OAuth client ID option.

On the next page, select Web application as the application type. Enter a Name. For the next two fields, you will need your tenant ID from Azure B2C. In the screenshot, you can see my where I did this with my tenant ID of testingorg3. Also, make sure and enter the URLs in all lower case, I had redirect issues using mixed casing. For Authorized JavaScript origins use the URL https://yourtenantid.b2clogin.com and for Authorized redirect URIs use https://yourtenantid.b2clogin.com/testingorg3.onmicrosoft.com/oauth2/authresp

After clicking create you will see a dialog with your client ID and client secret make note of these as they will be needed when we add the login provider in Azure B2C.

Azure B2C Changes

Now that we have the Google side setup head over to Azure and find your Azure B2C resource. Select Identity provides from the navigation menu and click the Add button.

Enter a Name, I’m just using the name of the provider. Then, click on Identity provider type which will trigger the Select social identity provider selection to show. Click Google and then click OK.

Next, click Setup this identity provider which will show a fly out where you will need to enter your Client ID and Client secret provided by Google. After entering your values click OK.

Next, click the Create button at the bottom of the Add identity provider screen. When this process is done we will have two identity providers for this B2C resource email and Google. Next, we need to enable our new Google provider for our sign up/sign in user flow. From the menu select User flows and then click the flow you have set up for Sign up and sign in.

Next, select Identity providers, this will show a list of providers available for the selected flow. Check any additional providers the flow should use, Google, in our case. Finally, click Save.

Try it out

With all the above change attempt a login with your application and you will see Google as a sign in option.

Wrapping Up

Hopefully the above will give you a jump start on adding support for social logins to your applications. Adding other providers will really close to what we did for Google from the Azure B2C prospective, of course the sign up process will vary by provider.

Azure B2C: Social Logins Read More »

Azure B2C: Customize Layouts

In the post ASP.NET Core with Azure B2C Auth we did a walkthrough of setting up the basics of Azure B2C and creating a new application that used our new B2C setup for auth. This post is going to be using that same setup to show how to replace the Microsoft provided pages for sign up/sign in with your own custom pages.

Custom Page Hosting

Our custom page needs to be hosted somewhere public with CORS enabled. If the test application was hosted somewhere public we could just us it, but since it is running on localhost that isn’t currently an option. We are going to use Azure Blob storage for hosting in this example.

Create A Storage Account

From the Azure Portal select Storage accounts.

Click the Add button.

Next, on the Create storage account page, I used a new resource group and tried storage accounts names until I found an unused one. For the rest of the fields, I took the defaults and then clicked Review + create.

On the review + create page it takes a few seconds for the account to be validated. After validation click the Create button.

After the storage deployment is complete click the Go to resource button.

Setup Blob storage

The above will land you on the Overview page for the new storage account. Select CORS from the menu.

Since this is just a test I’m allowing everything under the Blob service, for a real deploy I would recommend only allowing the values you expect requests from. After setting your values click the Save button.

Back on the storage menu on the right side of the screen select Blobs.

Click the + Container button to create a new blob storage container.

In the new container, page enter a name and select your public access level. I’m going with the most permissive access level, for a production system you will need to evaluate the appropriate access level for your use case. Click OK when done.

When done you will be returned to your list of containers. Click on the container that was just created to view the details.

Create a custom page

Now that we have our blob storage we need to create the HTML page that we want to to use instead of the default. The following is the code for the page I’m going to use. It is going to be super ugly as I’m not going to use any styling.

<!DOCTYPE html>
<html>
  <head>
    <title>Custom Page!</title>
  </head>
  <body>
    <h1>Custom Page!</h1>
    <div id="api"></div> 
  </body>
</html>

You can make this page look however you want, but it will always need the div with the ID of API as this is where Azure will inject the elements that actually handle the signup/sign in. Save your page.

Upload custom page to blob storage

Back in Azure click the Upload button and then select your file and click the Upload button.

After upload, you will be returned to the list of items in your current container. Click the item you just created. In the details copy the URL as we are going to need it to give B2C the location of our custom page.

B2C use custom page

In your portal head back to your Azure AD B2C page and select User flows.

Select the flow you want to use the custom page for. In our case, we are going to be using the flow for Sign up and sign in.

In the Customize section select Page layouts.

In the bottom of the page select Yes for  Use custom page content and past the link to your blob from above into the Custome page URI field and click Save.

Try it out

With all of the above setup you can now go back to the application using B2C and hit your sign in link and you will see your custom page. Here is what the one in the sample looks like.

Obviously, this example is really ugly and isn’t something you would do to your users, but it gives you the basic idea of how to use a custom page.

Wrapping Up

Hopefully the above will help you get started with customizing you B2C related pages to give your users a more consistent look and feel. The above only uploaded an HTML page to blob storage, but you could also upload a CSS file or any other assets you need. Also, don’t forget if your site is publicly accessible the assets can be stored with the rest of your application in that is appropriate, just remember to configure CORS to allow requests from Azure.

If you want more information on this topic check out the official docs from Microsoft on the subject.

Azure B2C: Customize Layouts Read More »

ASP.NET Core with Azure B2C Auth

I ran into a previous co-work a while back and they were talking about using Azure’s B2C for authentication on their apps. It sounded like a good solution. This blog post is going to cover getting the Azure B2C setup and will cover creating a sample application that will use B2C for authorization.

Create Azure Active Directory B2C

This all assumes you already have an Azure account. If you don’t you can sign up for a free trial (not an affiliate link). After you are signed up head to the Azure Portal.

Note: you can skip this section if you want to use the default Active Directory that is on your Azure account.

In the upper left click the Create a resource link.

In the search box look for Azure Active Directory B2C.

After selecting Azure Active Directory B2C more information will load to the right in a new panel. Click the Create button to continue.

Next, select if you want to create a new B2C tenant or use an existing one. I don’t have an existing one so the following flow will be for creating a new tenant.

On the next panel, you will need to enter an organization name and initial domain name. After entering valid values click the create button.

Switch Active Directory

Now that the new directory has been created we need to switch to the new directory in the Azure Portal. In the left panel click Azure Active Directory.

Click the Switch directory link.

A new panel will show on the right side of the screen with a list of directories you have available. Select the one you created in the steps above or an existing one you would like to use.

Using the search box in the top middle of the portal find Azure AD B2C.

Sample Application

Before moving forward on the Azure side we are going to create our sample client application. This little detour will make it easier for me to point out what values in Azure need to go where in the application configuration.

To create a new web application already set up to use Azure B2C use the following .NET CLI command from a command prompt. There is also a Visual Studio template if you prefer that route.

dotnet new webapp --auth IndividualB2C

In the resulting application, your appsettings.json will have the following section for AzureAdB2C.

"AzureAdB2C": {
  "Instance": "https://login.microsoftonline.com/tfp/",
  "ClientId": "11111111-1111-1111-11111111111111111",
  "CallbackPath": "/signin-oidc",
  "Domain": "qualified.domain.name",
  "SignUpSignInPolicyId": "",
  "ResetPasswordPolicyId": "",
  "EditProfilePolicyId": ""
}

Azure AD B2C Setup

Back to the Azure portal and the Azure AD B2C service page. In the Overview page, the first thing we need to make note of and use to set some configuration values in our application for is the Domain name.

In your appsettings.json file use this value for your Domain value.

"Domain": "TestingOrg3.onmicrosoft.com"

The subdomain is also used to build the Instance like the following.

"Instance": "https://TestingOrg3.b2clogin.com/tfp/"

On the panel that loads hit the Add button. On the new Application panel, we need to give the application a Name, select the type of clients which is Web App / Web API in our case. Next, is the Reply URL which with default setup is your base url/sigin-oidc. I messed this value up in the beginning and got some really strange errors. Finally hit the Create button.

After the creation process is complete copy the value in the Application ID field and use it as ClientId in your appsettings.json file.

Back in Azure select the User flows (policies) option.

At the top of the panel that loads click the New user flow button. The next panel shows a selection of flows that can be added. The application we are making will use both the Sign up and sign in flow and the Password rest flow. I’m only going to walk through the first one, but the second one is very smiliar. Click on the Sign up and sign in like.

In the creation process you will need to set a Name for the flow and select the Identity providers that are valid for the flow. You also have the choice of fields to collect with this flow and which ones should be returned with the claim. After those options are set click the Create button.

The Name form this screen will need to be entered in your appsettings.json file for the SignUpSignInPolicyId value. Here is what I ended up with in my settings file with the Sign Up and Reset Password policies.

"SignUpSignInPolicyId": "B2C_1_SignInOut",
"ResetPasswordPolicyId": "B2C_1_PasswordReset"

Run the sample

At this point, you can run your sample application and click the Sign in link and you will see a page similar to the following which is coming from Azure B2C.

There are ways to customize the pages users will see under the associated flow in Azure.

Wrapping Up

I hit quite a few issues getting Azure B2C setup. I hope this post will help you all bypass some of the issues I hit.

ASP.NET Core with Azure B2C Auth Read More »