Add Git Ignore to an existing Visual Studio Solution (New Git Experience)

A few years ago I wrote a post covering how to Add Git Ignore to an existing Visual Studio Project which was using Visual Studio 2015 I believe. Though it is an old post, it holds up through the current version of Visual Studio. Fast forward to today and Visual Studio has a new Git Experience in preview which alters this process. This post will cover adding a Git ignore file to an existing solution using Visual Studio’s new Git experience. If you don’t see the Git menu in Visual Studio see the previous link for information on enabling the feature preview.

Using Visual Studio to add a .gitignore

Open Visual Studio and the solution needing an ignore file. From the top menu select Git > Settings.

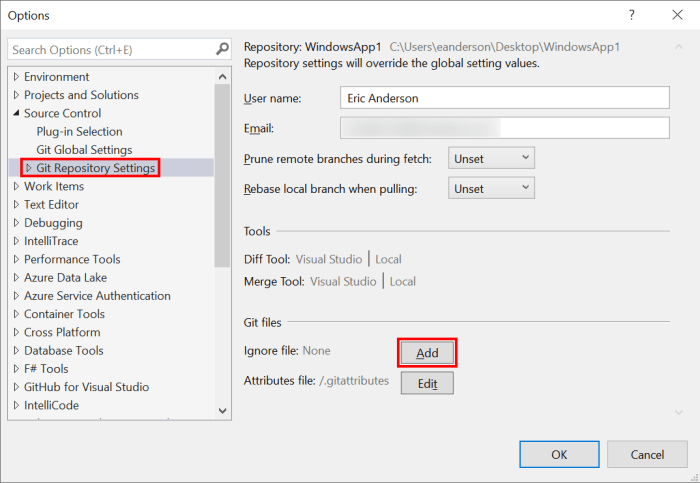
The above will open Visual Studio’s Options with Source Control > Git Global Settings selected. From the list on the left select Git Repository Settings and then click the Add button for Ignore file.

The above will add a .gitignore file with all the proper files ignored for a typical Visual Studio setup. Switch to the Git Changes window and enter a commit message and then click the Commit Staged button to commit the change to your current working branch.

Stop tracking files that should be ignored

To stop tracking the files in the ignore file open a command prompt and navigate to the directory that contains your solution file (.sln) and run the following commands.

git rm -r --cached . 
git add .
git commit -am "Remove ignored files"

The Git commands above were pulled from here. There are other answers in that thread if the above doesn’t work on your project for some reason.

Wrapping Up

It is always simpler if you can start a project with a Git ignore file in place, but if for whatever reason that couldn’t happen hopefully this post will get you going. If you aren’t using the new Visual Studio Git experience then the original version of this post will be more helpful. Check out the Microsoft post for more details on the new Git experience.

Add Git Ignore to an existing Visual Studio Solution (New Git Experience) Read More »

Fall Ramblings

Welcome to the fall/autumn edition of ramblings.

COVID-19

Surprise, surprise COVID is still raging across the world and we are heading into flu season. To say this continues to be a stressor is a massive understatement. At some level, as people have gotten used to this new world and have started doing gatherings more it has gotten harder for them to understand that we still have to hold ourselves apart to make sure at-risk family members stay safe.

On the upside, we are hopefully getting closer and closer to better treatments and vaccines.

Remote Life

Working from home is going great and it seems like any of the rough bit have been worked out long ago, at least at our company. Microsoft Teams keeps getting better and better which has been a big help. For example, I can’t tell you how much I love not having to reset my virtual background at the start of every video interaction.

While office-related items seem to work well for me remotely I struggle on the user group/conference/community side of things. I would much rather watch a video of the content that join live. For me being remote means there is very little value in being forced to watch the content live. If you run a conference or a user group please make your content available after the fact if it is possible. I do wonder if I’m the only one who is struggling with this or it others are feeling the same way. I want to learn, but the thought of spending n hours watching videos isn’t what I’m looking to do, but taking that same content and letting me watch it over days or weeks I am interested in.

Blogging

DbUp and Web Template Studio have recently been keeping the tech side of the blog going. At this point I have pretty much run through all the content I had planned so I will be looking for new topics. I still haven’t covered anything .NET 5 related which at the release candidate point with the final version coming in November. The table rebuilds stuff for Sqlite migrations in Entity Framework Core 5 look amazing, for example. I’m also kicking around doing a post on converting a library from the old school project to the new SDK style and targeting .NET Standard 2.0.

Dealing with Stress

If you follow the books section of the site you will notice that the number of fiction books has increased dramatically this year. One of the reasons is it helps me deal with the stress of this year with some level of escape where the non-fiction stuff tends to focus me on the stress more as I look for ways to apply the lessons from the books. The amount of video games I play has increased as well. I know these are short term solutions to the new world order and as I better adjust over time I plan to move back to a more healthy mix. On the move positive side of dealing with stress, I have done much better at consistently exercising.

Wrapping Up

I hope you enjoyed this edition of my ramblings! See you back with another edition in a few months.

Fall Ramblings Read More »

Database Creation with DbUp

This is going to be a quick post to show how to configure DbUp to create a new database on top of the migration functionality we have covered in the past. Use the following post to catch up on the DbUp topics we have covered in the past.

Database Migrations with DbUp
Code-based Database Migrations with DbUp
Always Run Migrations with DbUp
Logging Script Output with DbUp
Migrations in Transactions with DbUp

Database Creation

The code for database creation is a one-liner that just needs a connection string and should be run before any migrations. The following is part of our Main function for the sample application we have been working with with the EnsureDatabase line added and highlighted which is the code that takes care of database creation.

static int Main(string[] args)
{
    var connectionString =
        args.FirstOrDefault()
        ?? "Server=localhost; Database=WideWorldImporters; Trusted_connection=true";

    EnsureDatabase.For.SqlDatabase(connectionString);

    var upgrader =
        DeployChanges.To
                     .SqlDatabase(connectionString)
                     .WithScriptsAndCodeEmbeddedInAssembly(Assembly.GetExecutingAssembly(),
                                                           f => !f.Contains(".AlwaysRun."))
                     .LogToConsole()
                     .WithTransaction()
                     .Build();

    var result = upgrader.PerformUpgrade();

Wrapping Up

As you can see it is simple to add the ability to create databases in your DbUp applications. Database creation in the official DbUp docs is just a note and is easy to miss so I wanted to do a post to call it out as it is a powerful feature when you need it. In our example, the application will always attempt to create the database if it doesn’t exist, but if that doesn’t fit your use case it might be worth wrapping database creation in an argument so the user could decide if the database should be created or not.

Database Creation with DbUp Read More »

Don’t Launch a Browser Running ASP.NET Core Back-end Created from Web Template Studio

In last week’s post, I mentioned off-hand that we could stop VSCode from launching a web browser when starting a debug session on the back-end of our application. This is going to be a quick post on how to stop that browser launch.  The following are the previous Web Template Studio related posts if you want to catch up.

Create an Application with Web Template Studio
Debug ASP.NET Core Back-end Created from Web Template Studio


Launch Configurations

If you recall from last week to run our back-end we used the debug tab in VSCode and then hit the Run button for the .NET Core Launch (web) configuration.

The options that are available for running in VSCode are controlled by a launch.json file found in the .vscode directory. The following screenshot is the launch.json for the sample project from last week.

Stop the Browser

To stop the browser from opening delete the serverReadyAction section in the specific configuration you are dealing with. From the sample in the screenshot above the following is what would be removed from the  .NET Core Launch (web) configuration.

// Enable launching a web browser when ASP.NET Core starts. For more information: https://aka.ms/VSCode-CS-LaunchJson-WebBrowser
"serverReadyAction": {
    "action": "openExternally",
    "pattern": "\\bNow listening on:\\s+(https?://\\S+)"
},

With the above removed hitting the run button for this configuration will no longer launch a browser, but the rest of the debugging experience will remain as it was before.

Wrapping Up

Hopefully, this will help remove a little annoyance in the development. For more details on the serverReadyAction check out the docs. I also recommend checking out the full docs for launch.json to get a good feel of what all is possible.

Don’t Launch a Browser Running ASP.NET Core Back-end Created from Web Template Studio Read More »

Debug ASP.NET Core Back-end Created from Web Template Studio

Last week we covered how to Create an Application with Web Template Studio and now that we have an application we are going to work through how to debug the ASP.NET Core back-end.

Sample Application

The sample application used in this post has been expanded from what we used last week to include two instances of each page type provided by Web Template Studio. The gird, list, and master/detail page types trigger controllers to be added to our back-end application which will give us something to work with. To add these extra page types you have to run through the full wizard in Web Template Studio and not use the create project button on the first page of the wizard. The following is a screenshot of the new sample application with the extra page types.

Debugging in VSCode

Our goal in this post is going to be to hit a breakpoint in the controller action that returns the data for the gird page in the screenshot above. Looking through the project under server/Controllers it looks pretty likely that we are interested in the GridController. This controller only has one action so click to the left of the line number for the line that has the return statement for the Get function.

Unlike the post from last week to debug the back-end we need to run it separate from the front-end which means we need to move away from using npm start to run the whole application. Use the following command to start just the front-end.

npm start-frontend

Now to run the back-end goto the Run section in VSCode and then click the Play button to run the back-end using the .NET Core Launch (web) profile.

This will launch a blank page which we don’t need and it can be closed. If the blank page bothers you too much it can be changed in the launch profile. Now that our back-end is running use the front-end to navigate to the Grid page.

Wrapping Up

Hopefully, with the above steps, you are ready to debug the back-end part of your application. I’m betting for most of us running the front-end and back-end separately is going to more closely match how we normally work. For more information on debugging in VSCode check out the official doc.

Debug ASP.NET Core Back-end Created from Web Template Studio Read More »

Create an Application with Web Template Studio

Creating new applications is something I do a fair amount of. Most of the time they are throwaway projects used to test something out or demo projects used for this blog. With all the project creation going on I try and keep an eye out for tools that make the process easier. This post is going to cover a tool a came across a few weeks ago from Microsoft call Web Template Studio (WebTS).

What is WebTS?

From the project’s GitHub read me:

Microsoft Web Template Studio (WebTS) is a Visual Studio Code Extension that accelerates the creation of new web applications using a wizard-based experience. WebTS enables developers to generate boilerplate code for a web application by choosing between different front-end frameworks, back-end frameworks, pages and cloud services. The resulting web app is well-formed, readable code that incorporates cloud services on Azure while implementing proven patterns and best practices.

For the front-end, we have options of Angular, React, or Vue and on the back-end, there are options for ASP.NET Core, Flask, Molecular, or Node.

Installation

We are assuming you already have a recent version of Visual Studio Code (VSCode) installed, but if not you can download it from here. Open VSCode and from the left side of the screen select Extensions. In the search box at the top enter Web Template Studio and then from the list select Web Template Studio. In the detail page that opens click the green Install button at the top.

Project Creation

Now that we have the extension installed press Ctrl + Shift + P to open the VSCode command palette and enter Web Template Studio: Launch (or as much as needed for the option to show) and then select Web Template Studio: Launch.

This will launch the Web Template Studio project creation process. The first page that shows gives you a very basic set of options, but enough for our example. To see the full array of options Web Template Studio provides hit next on this first screen instead of Create Project like we do in this example. Also, note that if you want an ASP.NET [Core] back-end you need to select it on this summary screen as it isn’t yet an option later in the process. Back to our example, on this page, you will need to enter a Project Name, pick a Front-end Framework, and a Back-end Framework before finally clicking Create Project.

After the process finishes a dialog will show letting us know it is complete. Click Open Project to load the created project in a new instance of VSCode.

Running the Project

Before getting to a runnable state we need to run a couple of terminal commands first. This can be done from VSCode’s built-in terminal or from an external terminal of your choice. In VSCode if you don’t see a terminal you can use Cntrl + Shift + ` to open a new one, or from the menu select Terminal > New Terminal. The following are the two commands that need to be run using npm, but they can be adjusted to use yarn instead if you prefer it. The second command may be specific to an ASP.NET Core back-end, make sure and check the project README.md for verification.

npm install
npm run restore-packages

Now the project can be run with the following command.

npm start

The resulting application will look something like this.

Wrapping Up

WebTS seems to be a great tool for quickly getting a project up and running. I do recommend going through the full project creation wizard as it has options to set up Azure integration as well as the ability to add up to 20 different pages to the generated application. Also, keep in mind that the ASP.NET back-end framework option is pretty new so I wouldn’t be surprised to see some changes as it progresses through the preview stage. Make sure and check out the project’s GitHub repo.

Create an Application with Web Template Studio Read More »

Migrations in Transactions with DbUp

This post will be continuing our exploration of DbUp with the addition of transactions as part of migration execution. If you are new to DbUp check out the following post to catch up on this series.

Database Migrations with DbUp
Code-based Database Migrations with DbUp
Always Run Migrations with DbUp
Logging Script Output with DbUp

Transaction Types and Restrictions

DbUp has three different options for transactions. The default is no transaction, which is what we have been using so far. The other two options are a transaction per migration and finally a single transaction for all the migrations in a single upgrader. As far as I can tell so far there is no way to use the same transaction across multiple upgraders so that means in our sample application we could have our normal migrations work correctly and get committed, but have an issue in our always run migrations. The other thing to keep in mind is that some database providers don’t support transactions when changing the structure of the database. As pointed out by the DbUp docs, the Postgres docs have a good summary of transactional support for DDL of different database providers.

Adding Transactions

In the following example, we have changed the upgrader to use a single transaction. This is the full code for the upgrader with the change highlighted.

var upgrader =
    DeployChanges.To
                 .SqlDatabase(connectionString)
                 .WithScriptsAndCodeEmbeddedInAssembly(Assembly.GetExecutingAssembly(),
                                                       f => !f.Contains(".AlwaysRun."))
                 .LogToConsole()
                 .WithTransaction()
                 .Build();

The other options are WithTransactionPerScript for, surprise, a transaction per migration, and WithoutTransaction for no transactions (or just leave it out since this is the default value). The following is a sample of the output with transactions on with two different upgraders in play and the begin transactions highlighted.

Beginning transaction
Beginning database upgrade
Checking whether journal table exists..
Fetching list of already executed scripts.
No new scripts need to be executed - completing.
Beginning transaction
Beginning database upgrade
Executing Database Server script 'DbupTest.Scripts.AlwaysRun.01-EverytimeNoPrints.sql'
Executing Database Server script 'DbupTest.Scripts.AlwaysRun.02-EverytimeNoPrintsNoCountOn.sql'
Executing Database Server script 'DbupTest.Scripts.AlwaysRun.03-EverytimePrints.sql'
Executing Database Server script 'DbupTest.Scripts.AlwaysRun.04-EverytimePrintNoCountOn.sql'
Upgrade successful
Success!

Wrapping Up

DbUp makes adding transactions to your migrations super simple so this was a really short post. It would be nice to have an option to use a transaction across multiple upgraders. The official DbUp docs on transactions can be found here.

Migrations in Transactions with DbUp Read More »

Logging Script Output with DbUp

In today’s post, we will be going over how to log script output during a DbUp run. If you are new to this series of posts or DbUp in general you might find the following post helpful to review.

Database Migrations with DbUp
Code-based Database Migrations with DbUp
Always Run Migrations with DbUp

Enable Script Output Logging

I will be using the always run migrations we covered last weekend to simplify testing, but the concepts are the same for normal migrations. The change to enable script output logging is a single line added to our upgrader setup as you can see with the highlighted line in the following code.

var alwaysRunUpgrader =
    DeployChanges.To
                 .SqlDatabase(connectionString)
                 .WithScriptsAndCodeEmbeddedInAssembly(Assembly.GetExecutingAssembly(), 
                                                       f => f.Contains(".AlwaysRun."))
                 .JournalTo(new NullJournal())
                 .LogToConsole()
                 .LogScriptOutput()
                 .Build();

Running the application will result in something like the following. Notice the records affected line which is the output from our migration.

Beginning database upgrade
Checking whether journal table exists..
Fetching list of already executed scripts.
No new scripts need to be executed - completing.
Beginning database upgrade
Executing Database Server script 'DbupTest.Scripts.AlwaysRun.Everytime.sql'
RecordsAffected: 0

Upgrade successful
Success!

Improve the Script Output

So the above is great for a simple migration that has a single statement, but for more complex migrations it might be helpful to use PRINT statements to provide more information. Let’s tweak our script to print the start and end times of the execution. The following is the sample script (and yes I know it would never actually update anything).

PRINT CONVERT(VarChar, GETDATE(), 121)  + ' Start every time';

UPDATE Application.Cities SET CityName = 'Nothing' WHERE 1 = 0;

PRINT CONVERT(VarChar, GETDATE(), 121)  +  + ' End every time';

The above migration results in the following output.

Beginning database upgrade
Checking whether journal table exists..
Fetching list of already executed scripts.
No new scripts need to be executed - completing.
Beginning database upgrade
Executing Database Server script 'DbupTest.Scripts.AlwaysRun.Everytime.sql'
2020-08-05 06:15:21.877 Start every time

2020-08-05 06:15:21.877 End every time

RecordsAffected: 0

Upgrade successful
Success!

The prints are helpful, but the records affected is noise in this case, especially since it is the records affected for the last statement and does print per SQL statement. To suppress the records affected message we and use SET NOCOUNT ON in our script like the following.

SET NOCOUNT ON;

PRINT CONVERT(VarChar, GETDATE(), 121)  + ' Start every time with NoCount ON';

UPDATE Application.Cities SET CityName = 'Nothing' WHERE 1 = 0;

PRINT CONVERT(VarChar, GETDATE(), 121)  +  + ' End every time with NoCount ON';

SET NOCOUNT OFF;

And as you can see in the following we got a cleaner output.

Beginning database upgrade
Checking whether journal table exists..
Fetching list of already executed scripts.
No new scripts need to be executed - completing.
Beginning database upgrade
Executing Database Server script 'DbupTest.Scripts.AlwaysRun.Everytime.sql'
2020-08-05 06:38:18.863 Start every time

2020-08-05 06:38:18.863 End every time

Upgrade successful
Success!

Wrapping Up

Logging the output of scripts can be really helpful at times, but if you are going to use it as we saw above it is important to make sure and plan what that output is going to look like. Having 500 instances of the number of records affected isn’t necessarily helpful.

Logging Script Output with DbUp Read More »

Always Run Migrations with DbUp

In this post, we are going to walk through how to use DbUp to run specific migrations on every run instead of just once. If you are new to DbUp check out the following post to see how the sample project got to its current state.

Database Migrations with DbUp
Code-based Database Migrations with DbUp


Differentiating for Always Run

One of the keys to getting migrations that should run every time is being able to identify them separately from migrations that should only run once. This can be done at either the filename level or by placing all the always run files in a specific directory. This sample is going with the directory methods, but the file method would work basically the same way. In the sample project under the existing Scripts directory, I added an AlwaysRun directory. I also added an example script in this directory so we could verify that it is getting executed on every run. In the sample, the file is named Everytime.sql.

Based on the above when DbUp is processing it will see Everytime.sql as DbupTest.Scripts.AlwaysRun.Everytime.sql.

Filtering Out Always Run

Now that we have a way to identify the migrations we want to always run we need to filter them out of the existing upgrade process so that they don’t get included in the log of already executed migrations. In DbUp this log is referred to as the journal. The extension methods that setup how migrations will be located, either WithScriptsEmbeddedInAssembly or WithScriptsAndCodeEmbeddedInAssembly in our examples, can be provided with a filter which we will use to exclude migrations that are in the AlwaysRun directory. The following code is the upgrader with the filter in place.

var upgrader =
    DeployChanges.To
                 .SqlDatabase(connectionString)
                 .WithScriptsAndCodeEmbeddedInAssembly(Assembly.GetExecutingAssembly(),
                                                       f => !f.Contains(".AlwaysRun."))
                 .LogToConsole()
                 .Build();

var result = upgrader.PerformUpgrade();

Executing Always Run Migrations

Now that we have adjusted our original upgrader to exclude migrations in the AlwaysRun directory we need something to execute the always run migrations. To accomplish this we add a second upgrader that is filtered just to AlwaysRun scripts. The second really important bit about this second upgrader is that it uses a NullJournal. The NullJournal is what keeps the execution of the scripts from being logged which results in them always getting run. The following code was inserted after the above code. The highlighted bits point out the filter and null journal.

if (result.Successful)
{
    var alwaysRunUpgrader =
        DeployChanges.To
                     .SqlDatabase(connectionString)
                     .WithScriptsAndCodeEmbeddedInAssembly(Assembly.GetExecutingAssembly(),
                                                           f => f.Contains(".AlwaysRun."))
                     .JournalTo(new NullJournal())
                     .LogToConsole()
                     .Build();

    result = alwaysRunUpgrader.PerformUpgrade();
}

The following is the full Main function just in case the above code didn’t give enough context on how the code should fit together.

static int Main(string[] args)
{
    var connectionString =
        args.FirstOrDefault()
        ?? "Server=localhost; Database=WideWorldImporters; Trusted_connection=true";

    var upgrader =
        DeployChanges.To
                     .SqlDatabase(connectionString)
                     .WithScriptsAndCodeEmbeddedInAssembly(Assembly.GetExecutingAssembly(),
                                                           f => !f.Contains(".AlwaysRun."))
                     .LogToConsole()
                     .Build();

    var result = upgrader.PerformUpgrade();

    if (result.Successful)
    {
        var alwaysRunUpgrader =
            DeployChanges.To
                         .SqlDatabase(connectionString)
                         .WithScriptsAndCodeEmbeddedInAssembly(Assembly.GetExecutingAssembly(), 
                                                               f => f.Contains(".AlwaysRun."))
                         .JournalTo(new NullJournal())
                         .LogToConsole()
                         .Build();

        result = alwaysRunUpgrader.PerformUpgrade();
    }

    if (!result.Successful)
    {
        Console.ForegroundColor = ConsoleColor.Red;
        Console.WriteLine(result.Error);
        Console.ResetColor();
#if DEBUG
        Console.ReadLine();
#endif                
        return -1;
    }

    Console.ForegroundColor = ConsoleColor.Green;
    Console.WriteLine("Success!");
    Console.ResetColor();

    return 0;
}

Wrapping Up

With the above changes we now have a project that can run normal migrations, code-base migrations, and always run migrations. No matter what style of database change management you decide on having the changes in some sort of source control system will be super helpful.

For more information on DbUp’s journalling check out the official docs.

Always Run Migrations with DbUp Read More »

Code-based Database Migrations with DbUp

In today’s post, we are going to check out the code-based migration feature of DbUp which allows code to run as part of the migration process instead of just SQL based scripts. The ability to run code as part of the migration provides a ton of flexibility in the migration process. This builds on last week’s post, Database Migrations with DbUp, make sure and check it out if you are new to DbUp.

Script Provider Change

In our example application from last week’s post in the Program class when setting up our upgrader we used the following setup.

var upgrader =
    DeployChanges.To
                 .SqlDatabase(connectionString)
                 .WithScriptsEmbeddedInAssembly(Assembly.GetExecutingAssembly())
                 .LogToConsole()
                 .Build();

The above only picks up embedded SQL type files. In order to also pick up code-based migrations we have to change from the WithScriptsEmbeddedInAssembly script provider to WithScriptsAndCodeEmbeddedInAssembly. The following is the upgrader with the new script provider highlighted.

var upgrader =
    DeployChanges.To
                 .SqlDatabase(connectionString)
                 .WithScriptsAndCodeEmbeddedInAssembly(Assembly.GetExecutingAssembly())
                 .LogToConsole()
                 .Build();

Code-based Migrations

To add a code-based migration add a new class and set it to implement DbUp’s IScript interface. The script provider we changed to above will pick up any non-abstract class that implements IScript as well as SQL script files. The results are combined and sorted by name to determine execution order so make sure whatever naming convention you pick will sort properly for both your SQL scripts as well as code.

The IScript interface defines a single function, ProvideScript, that has a single parameter that provides a function to create a database command and returns a string. Depending on the need you can return a string with the SQL to be executed or you can create a command and execute any commands you need directly on the database or some combination of both if needed.

To test out code-based migrations, I added the following new class in the Scripts folder. It doesn’t actually change any data but instead logs some information to the console. Even without changing data it still conveys how code-based migrations work.

using System;
using System.Data;
using DbUp.Engine;

namespace DbupTest.Scripts
{
    public class Code0002Test : IScript
    {
        public string ProvideScript(Func<IDbCommand> dbCommandFactory)
        {
            using (var cmd = dbCommandFactory())
            {
                cmd.CommandText = "SELECT DeliveryMethodName FROM Application.DeliveryMethods";

                using (var dr = cmd.ExecuteReader())
                {
                    Console.WriteLine("  Delivery Methods");

                    while (dr.Read())
                    {
                        Console.WriteLine($"    {dr["DeliveryMethodName"]}");
                    }
                }
            }

            return string.Empty;
        }
    }
}

The following is the console output from running the application.

Beginning database upgrade
Checking whether journal table exists..
Fetching list of already executed scripts.
  Delivery Methods
    Air Freight
    Chilled Van
    Courier
    Customer Collect
    Customer Courier to Collect
    Delivery Van
    Post
    Refrigerated Air Freight
    Refrigerated Road Freight
    Road Freight
Executing Database Server script 'DbupTest.Scripts.Code0002Test.cs'
Checking whether journal table exists..
Upgrade successful
Success!

Wrapping Up

The ability to run code as part of the database migration process is an awesome set of functionality. I would advise sticking with SQL based migrations as default and only using code when SQL doesn’t provide a way to do what is needed or doing the migration in code is much more understandable. Make sure and check out the official DbUp docs on this feature for more information.

Code-based Database Migrations with DbUp Read More »